본 내용은 gasida님의 Cilium 스터디를 진행 후 정리한 내용입니다.
꾸준히 업데이트 하면서 작성됩니다
실습환경 구성
1주차와 마찬가지로 Vagrant 환경을 통해 실습이 구성됩니다.
cilium 설치 간 옵션이 변경되었는데 아래와 같습니다.
네이티브 라우팅을 위한 옵션들과 Hubble 설정을 위한 옵션을 확인할 수 있습니다.
helm install cilium cilium/cilium --version $2 --namespace kube-system \
--set k8sServiceHost=192.168.10.100 --set k8sServicePort=6443 \
--set ipam.mode="cluster-pool" --set ipam.operator.clusterPoolIPv4PodCIDRList={"172.20.0.0/16"} --set ipv4NativeRoutingCIDR=172.20.0.0/16 \
--set routingMode=native --set autoDirectNodeRoutes=true --set endpointRoutes.enabled=true \
--set kubeProxyReplacement=true --set bpf.masquerade=true --set installNoConntrackIptablesRules=true \
--set endpointHealthChecking.enabled=false --set healthChecking=false \
--set hubble.enabled=false --set operator.replicas=1 --set debug.enabled=true >/dev/null 2>&1
--set k8sServiceHost :Kubernetes API 서버 주소
--set k8sServicePort : Kubernetes API 서버 포트
--set ipam.mode="cluster-pool" : IPAM 모드
--set ipam.operator.clusterPoolIPv4PodCIDRList : Pod IP 풀 설정
--set ipv4NativeRoutingCIDR : Native routing 경로로 사용할 CIDR
-> ipam.operator.clusterPoolIPv4PodCIDRList와 동일하게 설정
--set routingMode : Native 라우팅 모드
--set autoDirectNodeRoutes : 노드 간 직접 라우팅을 자동으로 활성화
--set endpointRoutes.enabled : 각 엔드포인트(Pod)에 개별 라우팅 경로 설정
--set bpf.masquerade=true : BPF 기반 마스커레이딩(NAT)을 활성화
--set kubeProxyReplacement=true : kube-proxy 대체 유무
--set debug.enabled : cilium 디버그 모드 활성화
--set hubble.enabled=false : hubble 비활성화
--set endpointHealthChecking.enabled=false: 엔드포인트 헬스 체크 기능을 비활성화 (파드레벨)
--set healthChecking=false: 전반적인 헬스 체크 기능을 비활성화
--set installNoConntrackIptablesRules=true : 연결 추적(conntrack) 관련 규칙 비활성화 -> itables 동작을 위한 커널 모듈
conntrack : Linux에서 Network Connection을 관리하는 역할을 수행하는 Netfilter Framework의 Module
Network Observability with Hubble

https://docs.cilium.io/en/stable/observability/hubble/
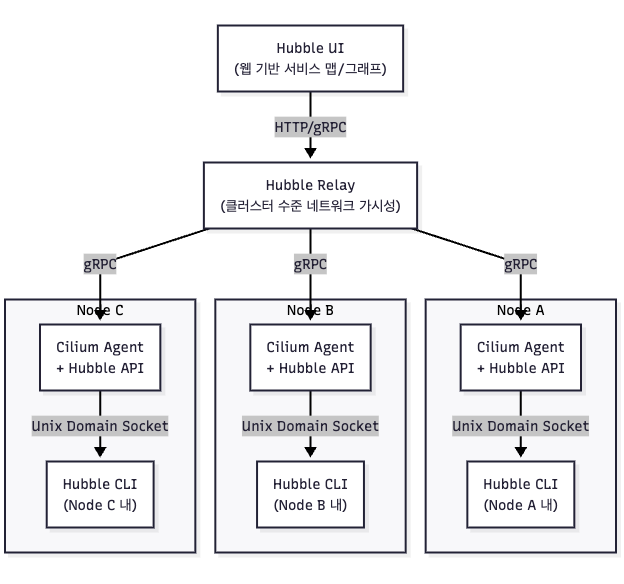
Hubble은 완전히 분산된 네트워킹 및 보안 관측 가능성 플랫폼
Cilium 과 eBPF를 기반으로 구축되어 서비스의 통신 및 동작뿐만 아니라 네트워킹 인프라에 대한 깊은 가시성을 완전히 투명하게 제공
: Hubble을 통해 어느 서비스가 누구와, 얼마나 자주, 실패 이유등을 파악할 수 있습니다.
Hubble API는 Cilium 에이전트가 실행되는 개별 노드의 범위 내에서 작동합니다.
Hubble CLI는 로컬 유닉스 도메인 소켓을 통해 제공되는 Hubble API를 쿼리하는 데 사용됩니다.
: Hubble CLI 도구가 (별도의 네트워크 연결 없이) 같은 노드에서 실행 중인
Cilium 에이전트 내의 Hubble 서버에 직접 연결하기 위해 유닉스 도메인 소켓이라는 통신 채널을 사용
Hubble CLI 바이너리는 기본적으로 Cilium 에이전트 포드에 설치
클러스터 전체의 가시성을 위해서는 Hubble Relay라는 추가 컴포넌트가 사용됩니다.
Hubble 설치
# 설치방안 1 : hubble 활성화, 메트릭 설정 등등
helm upgrade cilium cilium/cilium --namespace kube-system --reuse-values \
--set hubble.enabled=true \
--set hubble.relay.enabled=true \
--set hubble.ui.enabled=true \
--set hubble.ui.service.type=NodePort \
--set hubble.ui.service.nodePort=31234 \
--set hubble.export.static.enabled=true \
--set hubble.export.static.filePath=/var/run/cilium/hubble/events.log \
--set prometheus.enabled=true \
--set operator.prometheus.enabled=true \
--set hubble.metrics.enableOpenMetrics=true \
--set hubble.metrics.enabled="{dns,drop,tcp,flow,port-distribution,icmp,httpV2:exemplars=true;labelsContext=source_ip\,source_namespace\,source_workload\,destination_ip\,destination_namespace\,destination_workload\,traffic_direction}"

# 설치방안 2 : hubble 활성화
cilium hubble enable
cilium hubble enable --ui


# This is required for Relay to operate correctly.
cilium status
Hubble Relay:       OK

#
cilium config view | grep -i hubble
kubectl get cm -n kube-system cilium-config -o json | grep -i hubble

#
kubectl get secret -n kube-system | grep -iE 'cilium-ca|hubble'

# # Enabling Hubble requires the TCP port 4244 to be open on all nodes running Cilium.
ss -tnlp | grep -iE 'cilium|hubble' | tee after.txt
vi -d before.txt after.txt
for i in w1 w2 ; do echo ">> node : k8s-$i <<"; sshpass -p 'vagrant' ssh vagrant@k8s-$i sudo ss -tnlp |grep 4244 ; echo; done

#
kubectl get pod -n kube-system -l k8s-app=hubble-relay
kc describe pod -n kube-system -l k8s-app=hubble-relay

kc get svc,ep -n kube-system hubble-relay
...
NAME                     ENDPOINTS           AGE
endpoints/hubble-relay   172.20.1.202:4245   7m54s


# hubble-relay 는 hubble-peer 의 서비스(ClusterIP :443)을 통해 모든 노드의 :4244에 요청 가져올 수 있음
kubectl get cm -n kube-system
kubectl describe cm -n kube-system hubble-relay-config
...
cluster-name: default
peer-service: "hubble-peer.kube-system.svc.cluster.local.:443"
listen-address: :4245
...

#
kubectl get svc,ep -n kube-system hubble-peer
NAME                  TYPE        CLUSTER-IP    EXTERNAL-IP   PORT(S)   AGE
service/hubble-peer   ClusterIP   10.96.145.0   <none>        443/TCP   5h55m

NAME                    ENDPOINTS                                                     AGE
endpoints/hubble-peer   192.168.10.100:4244,192.168.10.101:4244,192.168.10.102:4244   5h55m

#
kc describe pod -n kube-system -l k8s-app=hubble-ui
...
Containers:
  frontend:
  ...
  backend:
...

kc describe cm -n kube-system hubble-ui-nginx
...

#
kubectl get svc,ep -n kube-system hubble-ui
NAME                TYPE       CLUSTER-IP    EXTERNAL-IP   PORT(S)        AGE
service/hubble-ui   NodePort   10.96.66.67   <none>        80:31234/TCP   17m

NAME                  ENDPOINTS          AGE
endpoints/hubble-ui   172.20.2.70:8081   17m

# hubble ui 웹 접속 주소 확인
NODEIP=$(ip -4 addr show eth1 | grep -oP '(?<=inet\s)\d+(\.\d+){3}')
echo -e "http://$NODEIP:31234"
서버 구성 간 사전 설치되어있습니다.


Hubble Relay
Hubble Relay는 여러 노드의 Cilium Agent (Hubble API가 내장) 와 통신하여 클러스터 전체의 네트워크 가시성을 얻습니다.
이를 위해 Cilium Agent 는 각 노드에서 gRPC 포트 : 4244 를 열고 있습니다.
hubble-peer는 이런 Cilium Agent들의 집합(서비스)이며,
이를 통해 Hubble Relay는 각 노드의 Hubble API(gRPC)를 자동으로 탐색하고 연결합니다.
### hubble-relay의 config
kubectl describe cm -n kube-system hubble-relay-config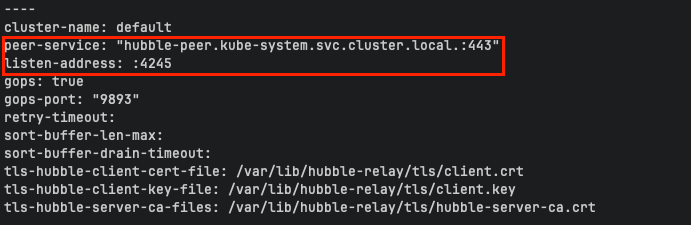
hubble-relay는 hubble-peer svc:443 으로 접근하고
해당 peer svc의 엔드포인트는 각 노드 cilium agent의 4244 포트입니다.
-> hubble-relay 는 hubble-peer 의 서비스(ClusterIP :443)을 통해 모든 노드의 :4244에 요청 가져올 수 있습니다.


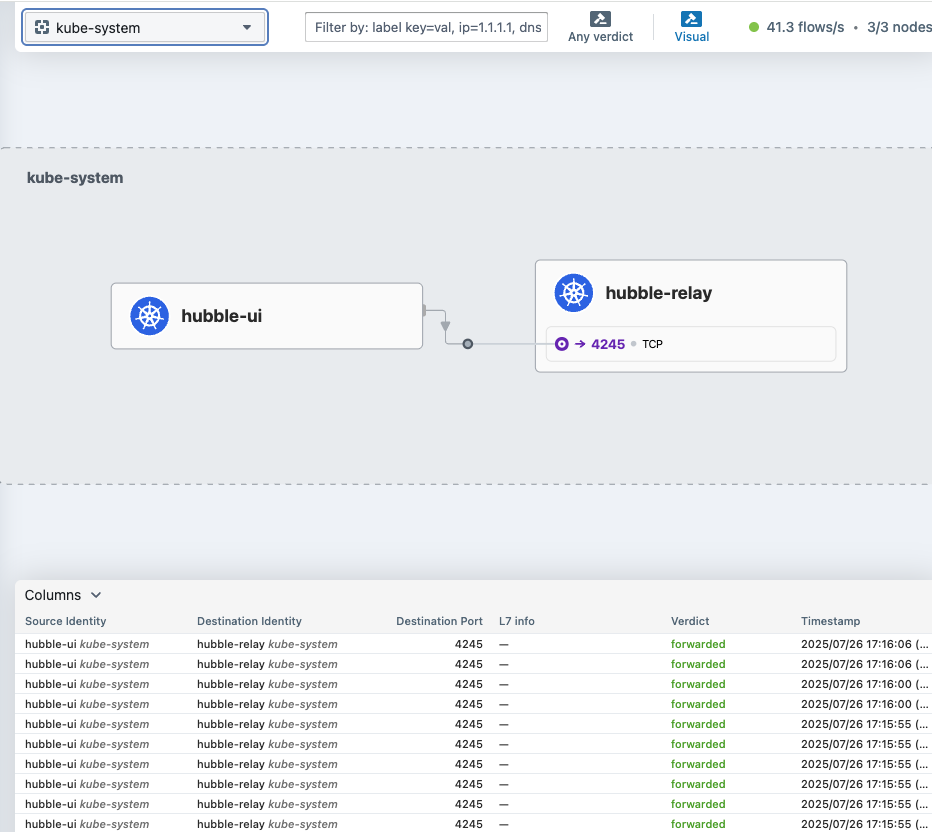
hubble UI 접근
kubectl get svc,ep -n kube-system hubble-ui

---
Warning: v1 Endpoints is deprecated in v1.33+; use discovery.k8s.io/v1 EndpointSlice
NAME                TYPE       CLUSTER-IP      EXTERNAL-IP   PORT(S)        AGE
service/hubble-ui   NodePort   10.96.117.158   <none>        80:31234/TCP   5d20h

NAME                  ENDPOINTS           AGE
endpoints/hubble-ui   172.20.1.117:8081   5d20h


### hubble ui 접근
(⎈|HomeLab:N/A) root@k8s-ctr:~# NODEIP=$(ip -4 addr show eth1 | grep -oP '(?<=inet\s)\d+(\.\d+){3}')
(⎈|HomeLab:N/A) root@k8s-ctr:~# echo -e "http://$NODEIP:31234"
http://192.168.10.100:31234
노드IP:노드포트 로 접근하면 hubble-ui 화면 확인이 가능합니다.
hubble CLI 설치
# Linux 실습 환경에 설치 시
HUBBLE_VERSION=$(curl -s https://raw.githubusercontent.com/cilium/hubble/master/stable.txt)
HUBBLE_ARCH=amd64
if [ "$(uname -m)" = "aarch64" ]; then HUBBLE_ARCH=arm64; fi
curl -L --fail --remote-name-all https://github.com/cilium/hubble/releases/download/$HUBBLE_VERSION/hubble-linux-${HUBBLE_ARCH}.tar.gz{,.sha256sum}
sudo tar xzvfC hubble-linux-${HUBBLE_ARCH}.tar.gz /usr/local/bin
which hubble
hubble status
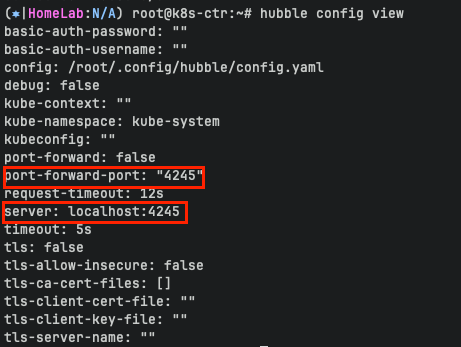
위에서 확인했듯이 hubble relay는 4245 포트를 통해 접근이 가능합니다.
접근을 위해서 포트를 열어줍니다.
cilium hubble port-forward&
##Hubble Relay is available at 127.0.0.1:4245

ss -tnlp | grep 4245


---
LISTEN 0      4096        127.0.0.1:4245       0.0.0.0:*    users:(("cilium",pid=9279,fd=7))
LISTEN 0      4096            [::1]:4245          [::]:*    users:(("cilium",pid=9279,fd=8))
## Hubble CLI가 Relay 서버에 잘 붙는지 확인
(⎈|HomeLab:N/A) root@k8s-ctr:~# hubble status
Healthcheck (via localhost:4245): Ok
Current/Max Flows: 12,285/12,285 (100.00%)
Flows/s: 43.13
Connected Nodes: 3/3
### hubble-relay --server 옵션을 통한 hubble api server 사용
kubectl patch svc -n kube-system hubble-relay -p '{"spec": {"type": "NodePort", "ports": [{"port": 80, "targetPort": 4245, "nodePort": 30005}]}}'
hubble --server 192.168.10.100:30005 observe
# (옵션) 현재 k8s-ctr 가상머신이 아닌, 자신의 PC에 kubeconfig 설정 후 아래 --server 옵션을 통해 hubble api server
hubble help status | grep 'server string'
      --server string                 Address of a Hubble server. Ignored when --input-file or --port-forward is provided. (default "localhost:4245")

# You can also query the flow API and look for flows
kubectl get ciliumendpoints.cilium.io -n kube-system # SECURITY IDENTITY
hubble observe
hubble observe -h
hubble observe -f

Cilium Agent 단축키 지정
# cilium 파드 이름
export CILIUMPOD0=$(kubectl get -l k8s-app=cilium pods -n kube-system --field-selector spec.nodeName=k8s-ctr -o jsonpath='{.items[0].metadata.name}')
export CILIUMPOD1=$(kubectl get -l k8s-app=cilium pods -n kube-system --field-selector spec.nodeName=k8s-w1 -o jsonpath='{.items[0].metadata.name}')
export CILIUMPOD2=$(kubectl get -l k8s-app=cilium pods -n kube-system --field-selector spec.nodeName=k8s-w2 -o jsonpath='{.items[0].metadata.name}')
echo $CILIUMPOD0 $CILIUMPOD1 $CILIUMPOD2
# 단축키(alias) 지정
alias c0="kubectl exec -it $CILIUMPOD0 -n kube-system -c cilium-agent -- cilium"
alias c1="kubectl exec -it $CILIUMPOD1 -n kube-system -c cilium-agent -- cilium"
alias c2="kubectl exec -it $CILIUMPOD2 -n kube-system -c cilium-agent -- cilium"
alias c0bpf="kubectl exec -it $CILIUMPOD0 -n kube-system -c cilium-agent -- bpftool"
alias c1bpf="kubectl exec -it $CILIUMPOD1 -n kube-system -c cilium-agent -- bpftool"
alias c2bpf="kubectl exec -it $CILIUMPOD2 -n kube-system -c cilium-agent -- bpftool"
# endpoint
c0 endpoint list
c0 endpoint list -o json
c1 endpoint list
c2 endpoint list
c1 endpoint get <id>
c1 endpoint log <id>
## Enable debugging output on the cilium-dbg monitor for this endpoint
c1 endpoint config <id> Debug=true
# monitor
c1 monitor
c1 monitor -v
c1 monitor -v -v
## Filter for only the events related to endpoint
c1 monitor --related-to=<id>
## Show notifications only for dropped packet events
c1 monitor --type drop
## Don’t dissect packet payload, display payload in hex information
c1 monitor -v -v --hex
## Layer7
c1 monitor -v --type l7
# Manage IP addresses and associated information - IP List
c0 ip list
# IDENTITY : 1(host), 2(world), 4(health), 6(remote), 파드마다 개별 ID
c0 ip list -n
# Retrieve information about an identity
c0 identity list
# 엔드포인트 기준 ID
c0 identity list --endpoints
# 엔드포인트 설정 확인 및 변경
c0 endpoint config <엔트포인트ID>
# 엔드포인트 상세 정보 확인
c0 endpoint get <엔트포인트ID>
# 엔드포인트 로그 확인
c0 endpoint log <엔트포인트ID>
# Show bpf filesystem mount details
c0 bpf fs show
# bfp 마운트 폴더 확인
tree /sys/fs/bpf
# Get list of loadbalancer services
c0 service list
c1 service list
c2 service list
## Or you can get the loadbalancer information using bpf list
c0 bpf lb list
c1 bpf lb list
c2 bpf lb list
## List reverse NAT entries
c1 bpf lb list --revnat
c2 bpf lb list --revnat
# List connection tracking entries
c0 bpf ct list global
c1 bpf ct list global
c2 bpf ct list global
# Flush connection tracking entries
c0 bpf ct flush
c1 bpf ct flush
c2 bpf ct flush
# List all NAT mapping entries
c0 bpf nat list
c1 bpf nat list
c2 bpf nat list
# Flush all NAT mapping entries
c0 bpf nat flush
c1 bpf nat flush
c2 bpf nat flush
# Manage the IPCache mappings for IP/CIDR <-> Identity
c0 bpf ipcache list# Display cgroup metadata maintained by Cilium
c0 cgroups list
c1 cgroups list
c2 cgroups list
# List all open BPF maps
c0 map list
c1 map list --verbose
c2 map list --verbose
c1 map events cilium_lb4_services_v2
c1 map events cilium_lb4_reverse_nat
c1 map events cilium_lxc
c1 map events cilium_ipcache
# List all metrics
c1 metrics list
# List contents of a policy BPF map : Dump all policy maps
c0 bpf policy get --all
c1 bpf policy get --all -n
c2 bpf policy get --all -n
# Dump StateDB contents as JSON
c0 statedb dump
#
c0 shell -- db/show devices
c1 shell -- db/show devices
c2 shell -- db/show devices
Getting Started with the Star Wars Demo & Hubble/UI
https://docs.cilium.io/en/stable/gettingstarted/demo/

조건
- 스타워즈에서 영감을 받은 예제에서는 데스스타, 타이파이터, 엑스윙의 세 가지 마이크로서비스 애플리케이션이 있습니다.
- 데스스타는 포트 80에서 HTTP 웹서비스를 실행하며, 이 서비스는 두 개의 포드 복제본에 걸쳐 데스스타에 대한 요청을 로드 밸런싱하는 Kubernetes 서비스로 노출됩니다.
- 데스스타 서비스는 제국의 우주선에 착륙 서비스를 제공하여 착륙 포트를 요청할 수 있도록 합니다.
- 타이파이터 포드는 일반적인 제국 선박의 착륙 요청 클라이언트 서비스를 나타내며, 엑스윙은 동맹 선박의 유사한 서비스를 나타냅니다.
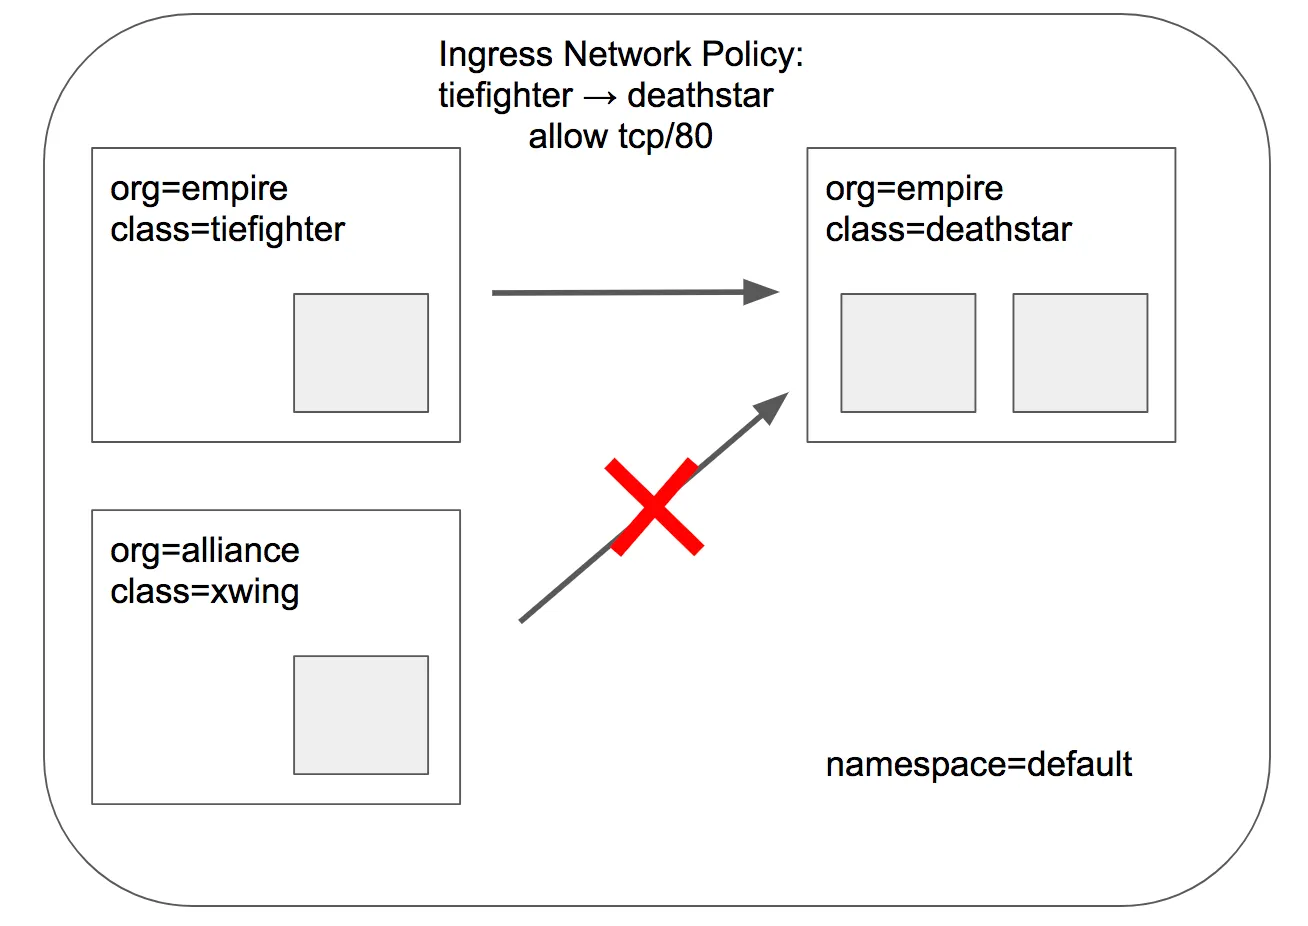
- 데스스타 착륙 서비스에 대한 접근 제어를 위한 다양한 보안 정책을 테스트할 수 있도록 존재합니다.
-> 데스스타는 타이파이터만 허용하고 엑스윙은 허용하면 안됩니다.
# 실습을 위해서 실습용 파드를 배포합니다
kubectl apply -f https://raw.githubusercontent.com/cilium/cilium/1.17.6/examples/minikube/http-sw-app.yaml
service/deathstar created
deployment.apps/deathstar created
pod/tiefighter created
pod/xwing created

# 파드 라벨 labels 확인합니다.
## 위 그림처럼 org 를 통해 제국/동맹 으로 구분되어 있습니다
kubectl get pod --show-labels
NAME                        READY   STATUS    RESTARTS   AGE   LABELS
deathstar-8c4c77fb7-9klws   1/1     Running   0          29s   app.kubernetes.io/name=deathstar,class=deathstar,org=empire,pod-template-hash=8c4c77fb7
deathstar-8c4c77fb7-kkwds   1/1     Running   0          29s   app.kubernetes.io/name=deathstar,class=deathstar,org=empire,pod-template-hash=8c4c77fb7
tiefighter                  1/1     Running   0          29s   app.kubernetes.io/name=tiefighter,class=tiefighter,org=empire
xwing                       1/1     Running   0          29s   app.kubernetes.io/name=xwing,class=xwing,org=alliance
### 데스스타의 정보확인
root@k8s-ctr:~# kubectl get deploy,svc,ep deathstar
----
Warning: v1 Endpoints is deprecated in v1.33+; use discovery.k8s.io/v1 EndpointSlice
NAME READY UP-TO-DATE AVAILABLE AGE
deployment.apps/deathstar 2/2 2 2 65s
NAME TYPE CLUSTER-IP EXTERNAL-IP PORT(S) AGE
service/deathstar ClusterIP 10.96.31.152 <none> 80/TCP 65s
NAME ENDPOINTS AGE
endpoints/deathstar 172.20.1.142:80,172.20.2.83:80 65s
identity 기반 네트워킹
ciliumendpoints
- 클러스터 내 모든 Pod의 Cilium Endpoint 정보를 보여줍니다
- 각 Pod는 Cilium에 의해 Endpoint라는 객체로 추적됩니다 (각 파드는 하나의 Endpoint)
- Endpoint에는 Pod의 IP 주소, 정책 적용 여부, 그리고 무엇보다 중요한 Security Identity가 할당

ciliumidentities
- Security Identity에 대한 메타데이터를 담고 있는 CRD
- 숫자 ID와 함께, 어떤 Label Selector(레이블 조합)에 의해 생성된 것인지 보여줍니다

kubectl get ciliumendpoints.cilium.io -A
kubectl get ciliumidentities.cilium.io
# cilium-agent가 실행되는 노드 내 관리파드의 엔드포인트 리스트를 확인합니다.
# 전체 agent가 아닌 하나의 agent 내 엔드포인트
kubectl exec -it -n kube-system ds/cilium -c cilium-agent -- cilium endpoint list
파드 IP를 통해 k8s-w2 에 동작중인 cilium-agent에서 명령어가 수행되었음을 알 수 있습니다.
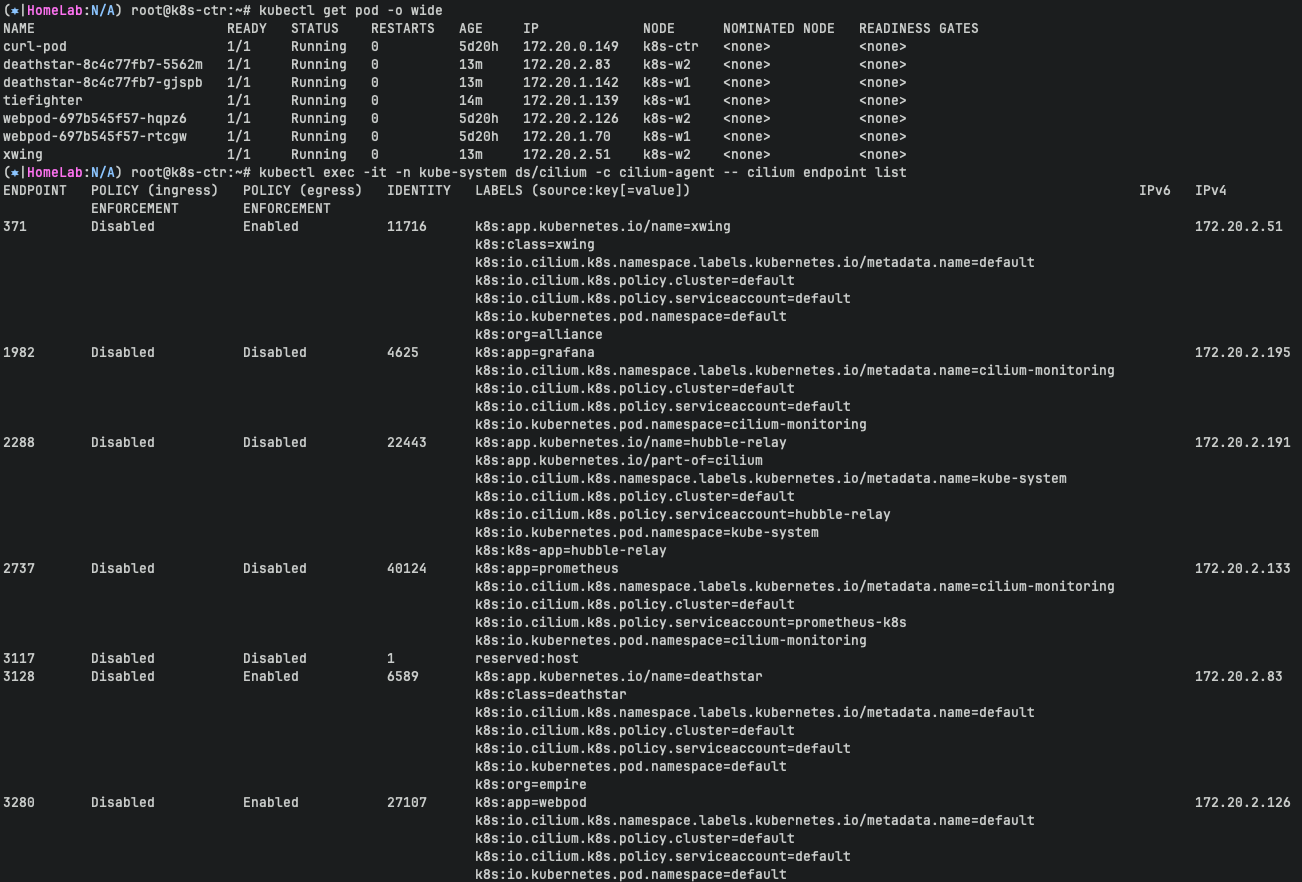
단축키 설정을 통해 endpoint 리스트를 쉽게 확인 가능합니다.
c0 endpoint list
c1 endpoint list
c2 endpoint list
cilium endpoint list
| ENDPOINT | Cilium이 내부적으로 관리하는 고유한 Endpoint ID(해당 노드에서만 유효) |
| POLICY (ingress) | Ingress(수신 방향) 정책 적용 여부 (Enabled, Disabled, Denied) |
| POLICY (egress) | Egress(송신 방향) 정책 적용 여부 |
| IDENTITY | 이 Endpoint에 할당된 Cilium Security Identity (정책 매칭 기준) |
| LABELS | 이 Endpoint(Pod)의 Kubernetes 레이블 정보→ CiliumIdentity와 보안 정책에 매핑되는 기준 |
| IPV4 | Pod의 IP 주소 (노드 로컬 또는 클러스터 내 IP) |
| STATE | Endpoint의 상태 (ready, disconnecting, waiting-for-identity 등) |
-> 현재 ingress/egress 에 정책(Policy) 없습니다
-> Labels 정보 확인가능합니다.

Check Current Access
- 데스스타 서비스의 관점에서 보면, org= empire 라벨이 부착된 선박만 연결하여 착륙을 요청할 수 있습니다.
- 우리는 규칙을 시행하지 않기 때문에 Xwing과 타이파이터 모두 착륙을 요청할 수 있습니다. 이를 테스트하려면 아래 명령을 사용하세요.
Identity 확인을 합니다.
xwing 과 tiefighter의 identity를 확인합니다.
c1 endpoint list | grep -iE 'xwing|tiefighter|deathstar'
c2 endpoint list | grep -iE 'xwing|tiefighter|deathstar'

32         Disabled           Enabled           4532       k8s:app.kubernetes.io/name=tiefighter                                               172.20.1.139   ready
                                                           k8s:class=tiefighter
1519       Disabled           Enabled           6589       k8s:app.kubernetes.io/name=deathstar                                                172.20.1.142   ready
                                                           k8s:class=deathstar
371        Disabled           Enabled           11716      k8s:app.kubernetes.io/name=xwing                                                          172.20.2.51    ready
                                                           k8s:class=xwing
3128       Disabled           Enabled           6589       k8s:app.kubernetes.io/name=deathstar                                                      172.20.2.83    ready

---
XWINGID=11716
TIEFIGHTERID=4532
DEATHSTARID=6589
모니터링을 위해 터미널 3개에서 아래 명령어를 사용합니다.
c0 monitor -v -v
c1 monitor -v -v
c2 monitor -v -v

# 모니터링 준비 : 터미널 1개
hubble observe -f

XWINGID=11716
TIEFIGHTERID=4532
DEATHSTARID=6589

---
hubble observe -f --protocol udp --from-identity $XWINGID
hubble observe -f --protocol tcp --from-identity $XWINGID

hubble observe -f --protocol tcp --from-identity $DEATHSTARID
착륙 하는 것을 확인 가능합니다.
# 호출 시도 1
kubectl exec xwing -- curl -s -XPOST deathstar.default.svc.cluster.local/v1/request-landing
while true; do kubectl exec xwing -- curl -s -XPOST deathstar.default.svc.cluster.local/v1/request-landing ; sleep 5 ; done

# 호출 시도 2
kubectl exec tiefighter -- curl -s -XPOST deathstar.default.svc.cluster.local/v1/request-landing
while true; do kubectl exec tiefighter -- curl -s -XPOST deathstar.default.svc.cluster.local/v1/request-landing ; sleep 5 ; done

## 모니터링
hubble observe -f --protocol tcp --from-identity $TIEFIGHTERID
hubble observe -f --protocol tcp --from-identity $DEATHSTARID
hubble observe -f --from-identity $XWINGID :
특정 보안 아이덴티티(Security Identity)를 가진 Pod에서 발생하는 네트워크 트래픽만 실시간으로 관찰하려는 명령
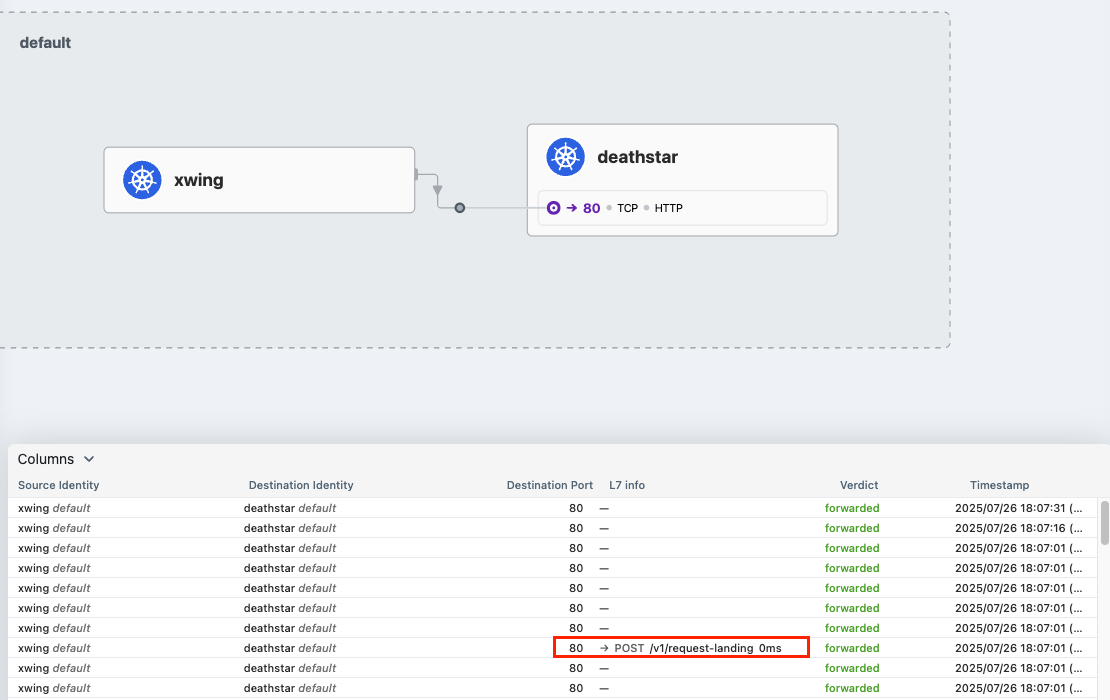
hubble observer 로 확인하면 xwing은 deathstar 에 접근되는 것이 확인됩니다.
hubble observe -f --protocol tcp --from-identity $XWINGID
hubble observe -f --protocol tcp --from-identity $DEATHSTARID
hubble-ui 에서도 확인 가능합니다.
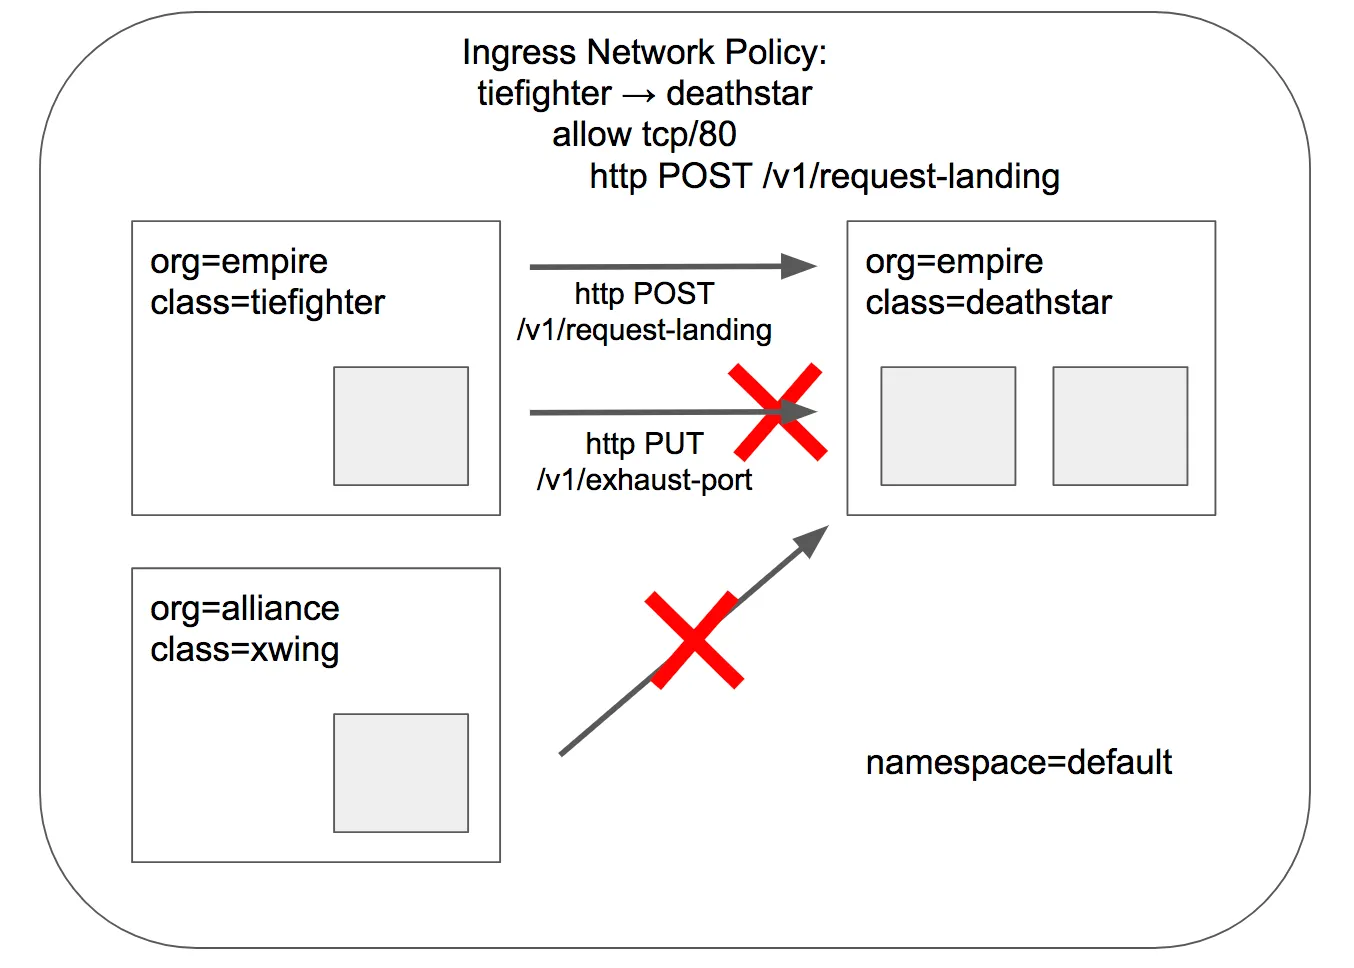
Apply an L3/L4 Policy
- Cilium을 사용할 때 보안 정책을 정의할 때 엔드포인트 IP 주소는 중요하지 않습니다. 대신 포드에 할당된 레이블을 사용하여 보안 정책을 정의할 수 있습니다. 정책은 클러스터 내에서 실행 중이거나 실행 중인 위치에 관계없이 레이블을 기반으로 올바른 포드에 적용됩니다. -> cilium은 보안정책을 정의할 때 파드의 IP가 아닌 파드 할당된 레이블을 통해 정의합니다.
- 데스스타 착륙 요청을 라벨이 있는 선박(org=empire)으로만 제한하는 기본 정책부터 시작하겠습니다. 이렇게 하면 org=empire 라벨이 없는 선박은 데스스타 서비스와 연결조차 할 수 없습니다. 이 정책은 IP 프로토콜(네트워크 계층 3)과 TCP 프로토콜(네트워크 계층 4)에만 적용되는 간단한 정책이므로 흔히 L3/L4 네트워크 보안 정책이라고 합니다.
- 참고: 실리움은 상태별 연결 추적을 수행합니다. 이는 정책이 프론트엔드가 백엔드에 도달할 수 있도록 허용하면, 동일한 TCP/UDP 연결 내에서 백엔드 응답의 일부인 모든 필수 응답 패킷이 자동으로 프 론트엔드에 도달하도록 허용한다는 것을 의미합니다. → 리턴 패킷 자동 허용! -> 단방향 정책 적용
적용되는 정책 (label 기반 정책 적용임을 확인할 수 있습니다)
deathstar Pod은 이제 모든 트래픽을 거부하고, 정책에 명시된 조건만 허용하게 됩니다. (default deny 상태)
# CiliumNetworkPolicy
## CiliumNetworkPolicys는 "endpointSelector"를 사용하여 팟 레이블에서 정책이 적용되는 소스와 목적지를 식별합니다.
## 아래 정책은 TCP 포트 80에서 레이블(org=empire)이 있는 모든 팟에서 레이블(org=empire, class=deathstar)이 있는 데스스타 팟으로 전송되는 트래픽을 화이트리스트로 작성합니다.
apiVersion: "cilium.io/v2"
kind: CiliumNetworkPolicy
metadata:
  name: "rule1"
spec:
  description: "L3-L4 policy to restrict deathstar access to empire ships only"
  endpointSelector:
    matchLabels:
      org: empire
      class: deathstar
  ingress:
  - fromEndpoints:
    - matchLabels:
        org: empire
    toPorts:
    - ports:
      - port: "80"
        protocol: TCP
정책을 적용합니다.
kubectl apply -f https://raw.githubusercontent.com/cilium/cilium/1.17.6/examples/minikube/sw_l3_l4_policy.yaml
kubectl get cnp
kubectl get cnp -o json | jq
정책 적용이 되었는지 확인을 위해 모니터링을 진행합니다.
기존 접근 되던 xwing -> deathstar 통신이 불가능한 것을 확인 할 수 있습니다.
kubectl exec xwing -- curl -s -XPOST deathstar.default.svc.cluster.local/v1/request-landing --connect-timeout 2
hubble observe -f --type drop
타이파이터는 여전히 접근 가능합니다. (org: empire 라벨을 가지고 있으므로 정책에 의해 허용됩니다)
# 모니터링
hubble observe -f --protocol tcp --from-identity $DEATHSTARID

# 호출 시도 2
kubectl exec tiefighter -- curl -s -XPOST deathstar.default.svc.cluster.local/v1/request-landing
inspecting the policy
deathstart ingress 에 정책이 적용되었는지 확인합니다.

### kc describe cnp rule1

Name:         rule1
Namespace:    default
Labels:       <none>
Annotations:  <none>
API Version:  cilium.io/v2
Kind:         CiliumNetworkPolicy
Metadata:
  Creation Timestamp:  2025-07-26T09:16:32Z
  Generation:          1
  Resource Version:    38409
  UID:                 4ca0e582-1f87-48e8-8f1b-763d2f4e29b1
Spec:
  Description:  L3-L4 policy to restrict deathstar access to empire ships only
  Endpoint Selector:
    Match Labels:
      Class:  deathstar
      Org:    empire
  Ingress:
    From Endpoints:
      Match Labels:
        Org:  empire
    To Ports:
      Ports:
        Port:      80
        Protocol:  TCP
Status:
  Conditions:
    Last Transition Time:  2025-07-26T09:16:32Z
    Message:               Policy validation succeeded
    Status:                True
    Type:                  Valid
Events:                    <none>
Life of Packet
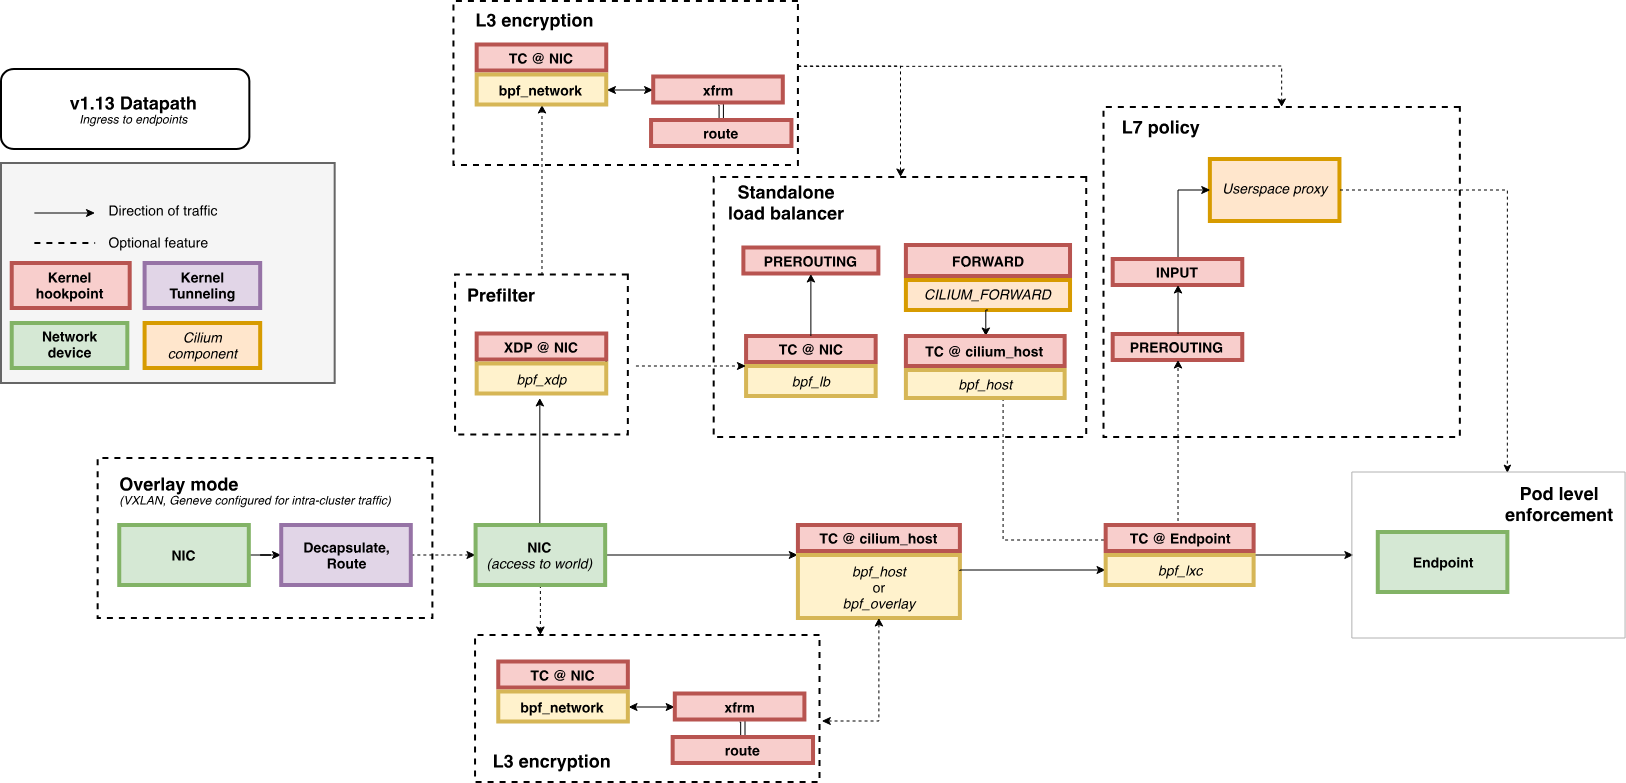
L7 동작 처리는 cilium-envoy 데몬셋이 담당합니다.
https://docs.cilium.io/en/stable/network/ebpf/lifeofapacket/
#
kubectl get ds -n kube-system
NAME           DESIRED   CURRENT   READY   UP-TO-DATE   AVAILABLE   NODE SELECTOR            AGE
cilium         3         3         3       3            3           kubernetes.io/os=linux   3h38m
cilium-envoy   3         3         3       3            3           kubernetes.io/os=linux   3h38m

kubectl get pod -n kube-system -l k8s-app=cilium-envoy -owide
NAME                 READY   STATUS    RESTARTS   AGE     IP               NODE      NOMINATED NODE   READINESS GATES
cilium-envoy-8427n   1/1     Running   0          3h38m   192.168.10.100   k8s-ctr   <none>           <none>
cilium-envoy-8rzsb   1/1     Running   0          3h36m   192.168.10.101   k8s-w1    <none>           <none>
cilium-envoy-vkqw6   1/1     Running   0          3h35m   192.168.10.102   k8s-w2    <none>           <none>

#
kc describe ds -n kube-system cilium-envoy
...
    Mounts:
      /sys/fs/bpf from bpf-maps (rw)
      /var/run/cilium/envoy/ from envoy-config (ro)
      /var/run/cilium/envoy/artifacts from envoy-artifacts (ro)
      /var/run/cilium/envoy/sockets from envoy-sockets (rw
   ...
   envoy-config:
    Type:      ConfigMap (a volume populated by a ConfigMap)
    Name:      cilium-envoy-config
    Optional:  false
...


kubectl exec -it -n kube-system ds/cilium -c cilium-agent -- ss -xnp | grep -i -envoy
u_str ESTAB 0      0                                                  /var/run/cilium/envoy/sockets/xds.sock 32644            * 32610 users:(("cilium-agent",pid=1,fd=64))
u_str ESTAB 0      0                                                /var/run/cilium/envoy/sockets/admin.sock 29697            * 29345
u_str ESTAB 0      0                                                /var/run/cilium/envoy/sockets/admin.sock 29340            * 28672

kc describe cm -n kube-system cilium-envoy-config
...
Data
====
bootstrap-config.json:
----
{"admin":{"address":{"pipe":{"path":"/var/run/cilium/envoy/sockets/admin.sock"}}}...
...
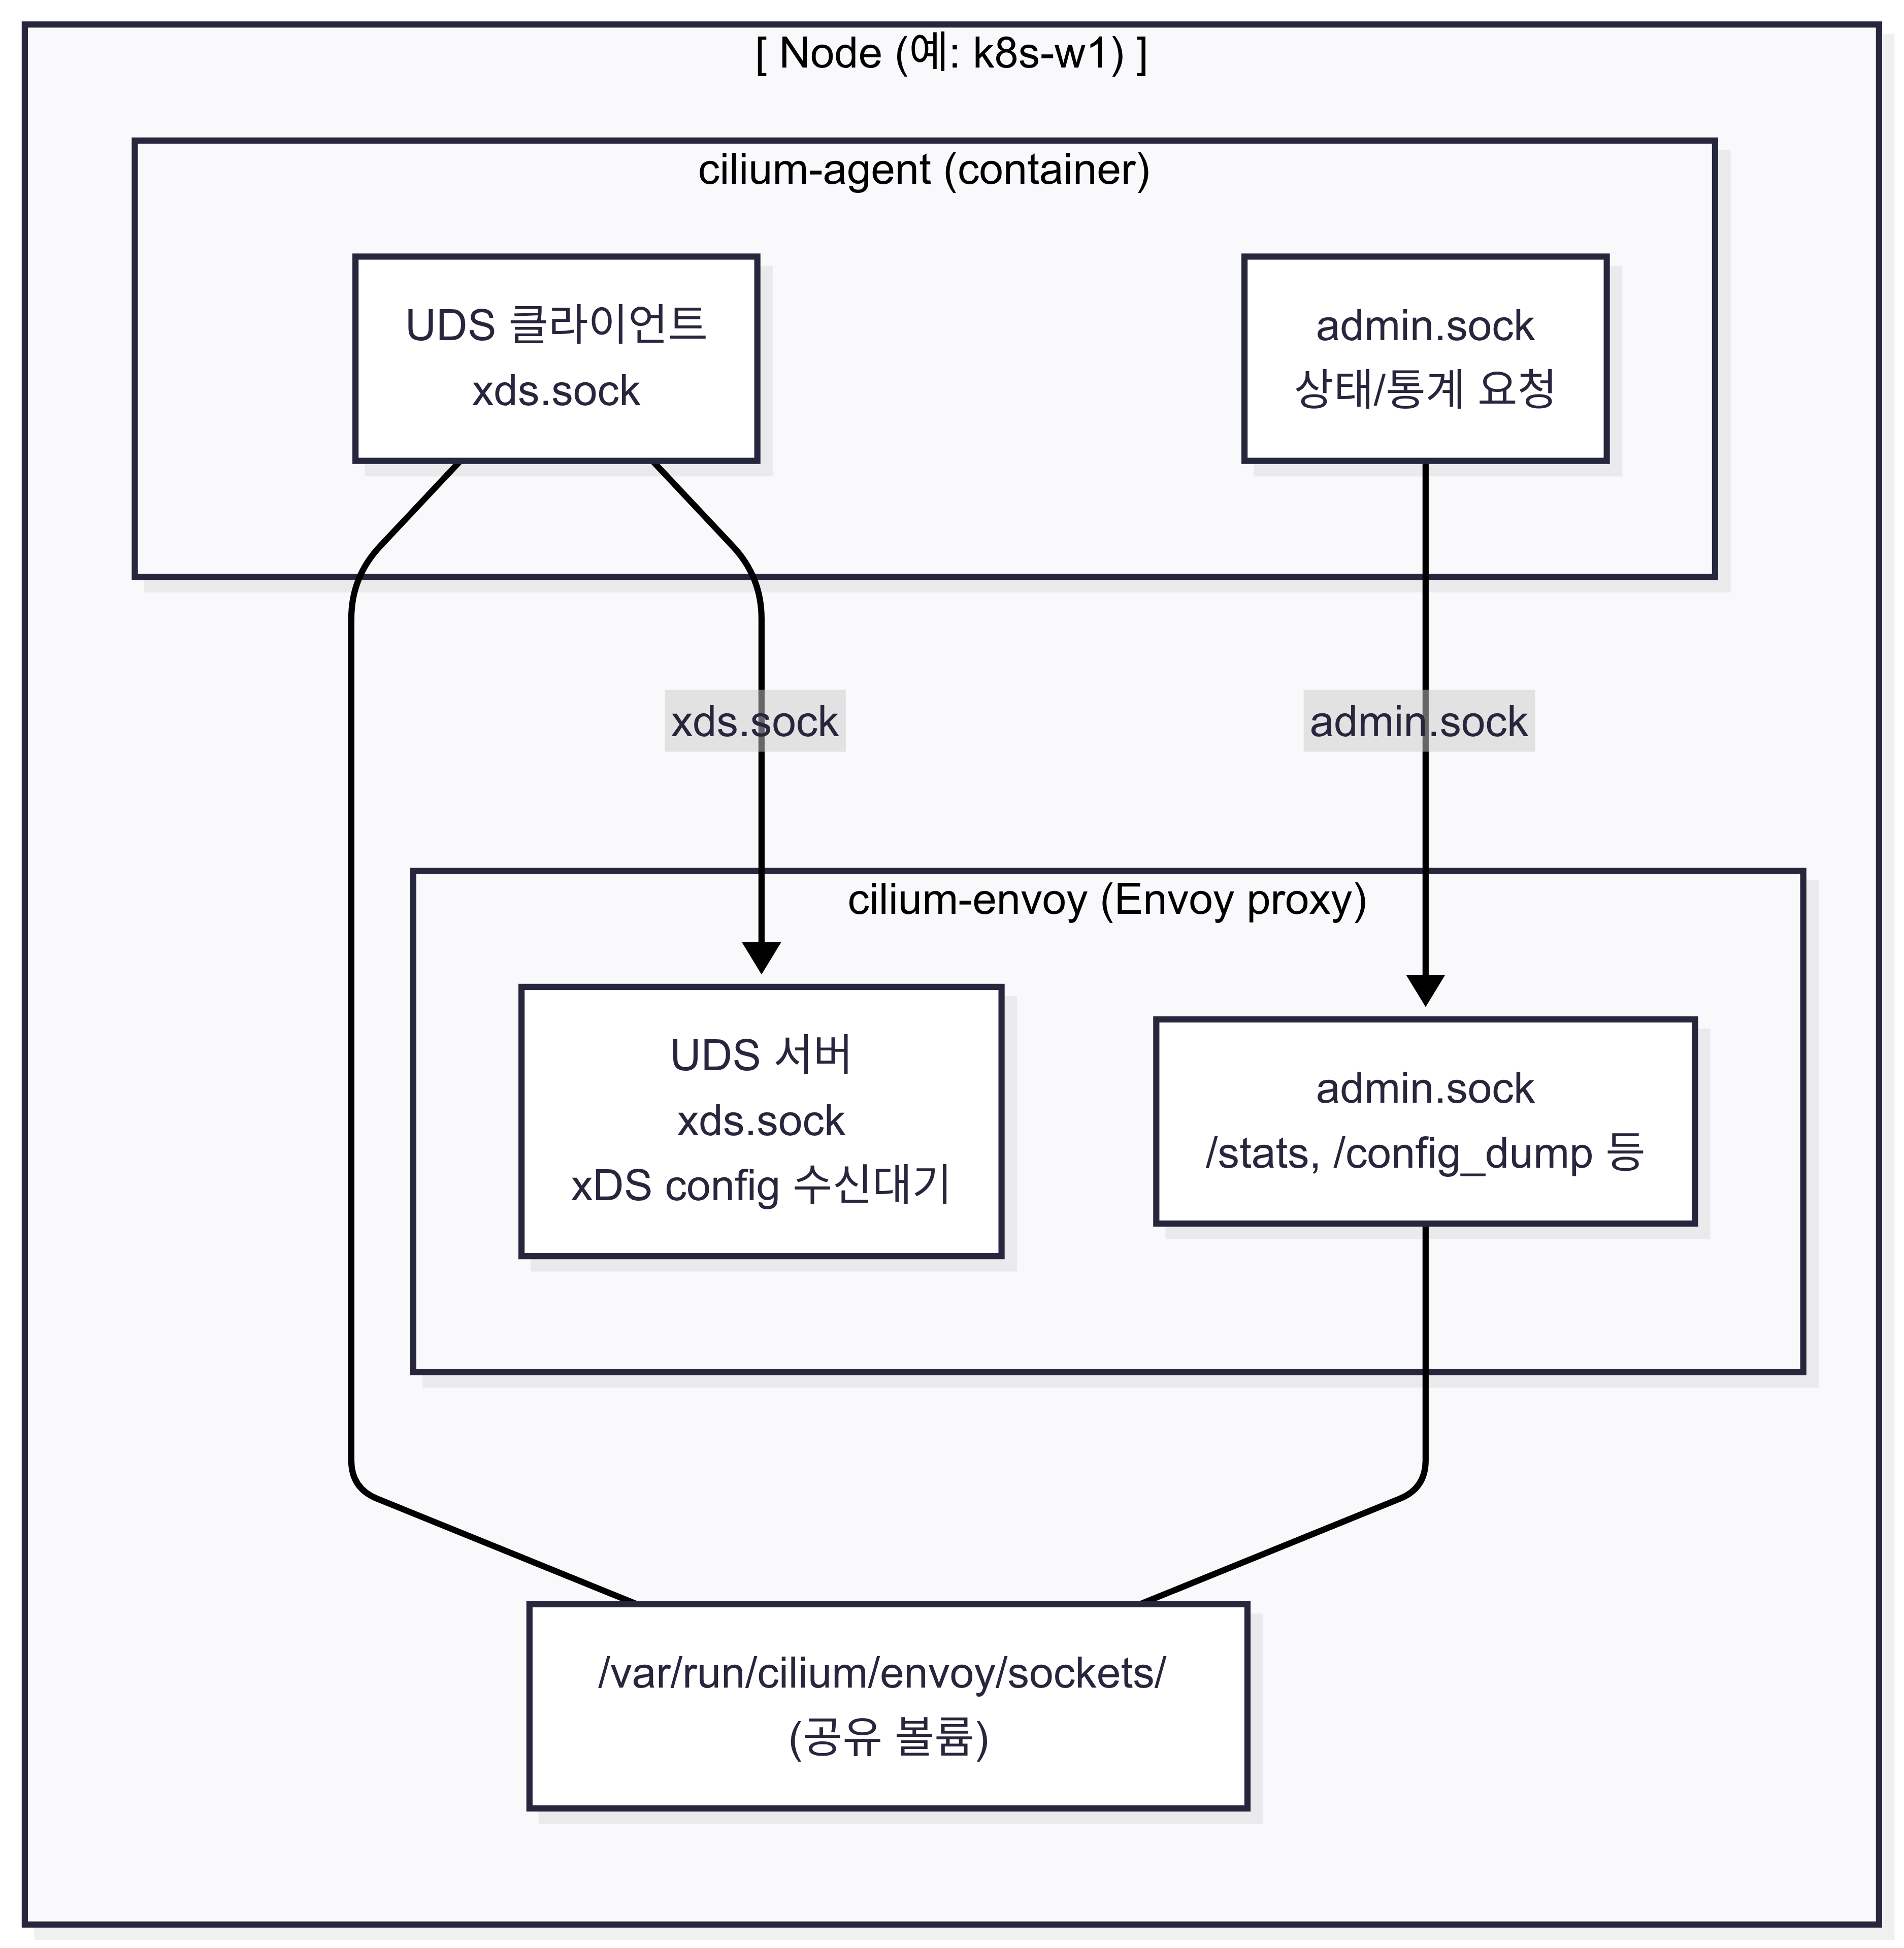
Cilium agent와 envoy 프록시 간 통신 구조
xds.sock : Envoy의 xDS 서버에 연결하여 설정을 수신하는 클라이언트 역할
admin.sock : Envoy의 관리 인터페이스를 통해 상태나 통계 정보를 요청
/var/run/cilium/envoy/sockets/ :
cilium-agent와 cilium-envoy가 서로 통신하기 위해 사용하는 Unix Domain Socket 파일들이 위치하는 공유 볼륨
Apply and Test HTTP-aware L7 Policy
- 위의 간단한 시나리오에서는 tiefighter / xwing에게 데스스타 API에 대한 전체 액세스 권한을 부여하거나 아예 액세스 권한을 부여하지 않는 것으로 충분했습니다. 그러나 마이크로서비스 간에 가장 강력한 보안(즉, 최소 권한 격리를 강제하는 것)을 제공하기 위해서는 데스스타 API를 호출하는 각 서비스가 합법적인 운영에 필요한 HTTP 요청 세트만 수행하도록 제한해야 합니다.
- 예를 들어, 데스스타 서비스가 임의의 제국 선박이 호출해서는 안 되는 일부 유지보수 API를 노출한다고 가정해 보겠습니다.
# 모니터링 >> Layer3/4 에서는 애플리케이션 상태를 확인 할 수 없음!
hubble observe -f --protocol tcp --from-identity $DEATHSTARID

# 호출해서는 안 되는 일부 유지보수 API를 노출
kubectl exec tiefighter -- curl -s -XPUT deathstar.default.svc.cluster.local/v1/exhaust-port
# 기존 rule1 정책을 업데이트 해서 사용
apiVersion: "cilium.io/v2"
kind: CiliumNetworkPolicy
metadata:
  name: "rule1"
spec:
  description: "L7 policy to restrict access to specific HTTP call"
  endpointSelector:
    matchLabels:
      org: empire
      class: deathstar
  ingress:
  - fromEndpoints:
    - matchLabels:
        org: empire
    toPorts:
    - ports:
      - port: "80"
        protocol: TCP
      rules:
        http:
        - method: "POST"
          path: "/v1/request-landing"

# Update the existing rule to apply L7-aware policy to protect deathstar using:
kubectl apply -f https://raw.githubusercontent.com/cilium/cilium/1.17.6/examples/minikube/sw_l3_l4_l7_policy.yaml
kubectl get cnp
kc describe cnp
c0 policy get


# 모니터링 : 파드 이름 지정
hubble observe -f --pod deathstar --protocol http
두번의 호출을 통해 어떤 결과가 나오는지 확인해봅니다.
(⎈|HomeLab:N/A) root@k8s-ctr:~# kubectl exec tiefighter -- curl -s -XPOST deathstar.default.svc.cluster.local/v1/request-landing
Ship landed
(⎈|HomeLab:N/A) root@k8s-ctr:~# kubectl exec tiefighter -- curl -s -XPUT deathstar.default.svc.cluster.local/v1/exhaust-port
Access denied
패킷이 드롭되는 것을 확인할 수 있습니다.
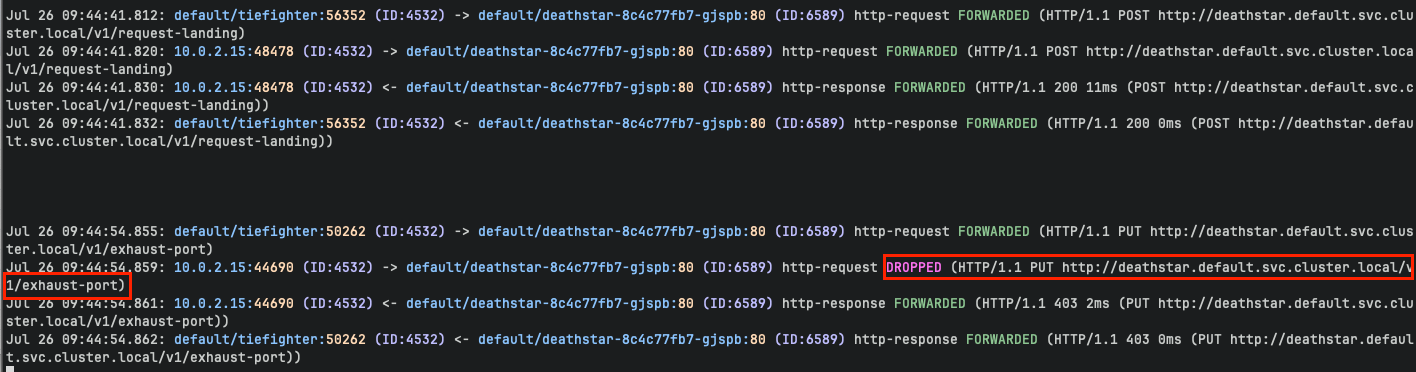

# 모니터링 : 파드 이름 지정
hubble observe -f --pod deathstar --verdict DROPPED
Jul 20 01:31:21.248: default/tiefighter:44734 (ID:19274) -> default/deathstar-8c4c77fb7-9klws:80 (ID:318) http-request DROPPED (HTTP/1.1 PUT http://deathstar.default.svc.cluster.local/v1/exhaust-port)

혹은
c1 monitor -v --type l7
<- Request http from 3845 ([k8s:app.kubernetes.io/name=tiefighter k8s:class=tiefighter k8s:io.cilium.k8s.namespace.labels.kubernetes.io/metadata.name=default k8s:io.cilium.k8s.policy.cluster=default k8s:io.cilium.k8s.policy.serviceaccount=default k8s:io.kubernetes.pod.namespace=default k8s:org=empire]) to 871 ([k8s:app.kubernetes.io/name=deathstar k8s:class=deathstar k8s:io.cilium.k8s.namespace.labels.kubernetes.io/metadata.name=default k8s:io.cilium.k8s.policy.cluster=default k8s:io.cilium.k8s.policy.serviceaccount=default k8s:io.kubernetes.pod.namespace=default k8s:org=empire]), identity 19274->318, verdict Denied PUT http://deathstar.default.svc.cluster.local/v1/exhaust-port => 0
<- Response http to 3845 ([k8s:app.kubernetes.io/name=tiefighter k8s:class=tiefighter k8s:io.cilium.k8s.namespace.labels.kubernetes.io/metadata.name=default k8s:io.cilium.k8s.policy.cluster=default k8s:io.cilium.k8s.policy.serviceaccount=default k8s:io.kubernetes.pod.namespace=default k8s:org=empire]) from 871 ([k8s:app.kubernetes.io/name=deathstar k8s:class=deathstar k8s:io.cilium.k8s.namespace.labels.kubernetes.io/metadata.name=default k8s:io.cilium.k8s.policy.cluster=default k8s:io.cilium.k8s.policy.serviceaccount=default k8s:io.kubernetes.pod.namespace=default k8s:org=empire]), identity 318->19274, verdict Forwarded PUT http://deathstar.default.svc.cluster.local/v1/exhaust-port => 403
c2 monitor -v --type l7


# We can now re-run the same test as above, but we will see a different outcome
kubectl exec tiefighter -- curl -s -XPUT deathstar.default.svc.cluster.local/v1/exhaust-port
Access denied


# 모니터링 : 파드 이름 지정
hubble observe -f --pod xwing

# 호출 시도 : 위와 아래 실행 종료의 차이점을 이해해보자!
kubectl exec xwing -- curl -s -XPOST deathstar.default.svc.cluster.local/v1/request-landing --connect-timeout 2
- kubectl exec tiefighter -- curl -s -XPUT deathstar.default.svc.cluster.local/v1/exhaust-port
- Cilium 정책에 의해 Deathstar는 empire(org=empire)만 허용
- 해당 HTTP 메서드(PUT) 혹은 경로(/v1/exhaust-port) 는 L7 정책상 차단됨
- curl 결과: "Access denied" 또는 403

- kubectl exec xwing -- curl -s -XPOST deathstar.default.svc.cluster.local/v1/request-landing --connect-timeout 2
- xwing은 org=rebel 이므로, Deathstar의 ingress 정책에 의해 L3/L4 단계에서 DROP (HTTP까지 못 감)
- 즉, 패킷이 전송되자마자 Cilium에서 바로 버림 (DROP)
(⎈|HomeLab:N/A) root@k8s-ctr:~# hubble observe -f --pod deathstar --verdict DROPPED
Jul 26 09:55:20.288: default/xwing:53892 (ID:11716) <> default/deathstar-8c4c77fb7-gjspb:80 (ID:6589) policy-verdict:none INGRESS DENIED (TCP Flags: SYN)
Configuring Hubble exporter
- Hubble Exporter는 나중에 사용할 수 있도록 Hubble flows 로그를 파일에 저장할 수 있는 cilium-agent의 기능입니다.
- Hubble Exporter는 file rotation, size limits, filters, field masks를 지원합니다.
- Hubble Exporter 설정 ← Hubble 설치 때 같이 적용되어 있음
# 설정 : 아래 설정할 필요 없음
helm upgrade cilium cilium/cilium --namespace kube-system --reuse-values \
--set hubble.enabled=true \
--set hubble.export.static.enabled=true \
--set hubble.export.static.filePath=/var/run/cilium/hubble/events.log
kubectl -n kube-system rollout status ds/cilium
# 확인
kubectl get cm -n kube-system cilium-config -o json | grep hubble-export
cilium config view | grep hubble-export
hubble-export-allowlist
hubble-export-denylist
hubble-export-fieldmask
hubble-export-file-max-backups # number of rotated Hubble export files to keep. (default 5)
hubble-export-file-max-size-mb # size in MB at which to rotate the Hubble export file. (default 10)
hubble-export-file-path # file path of target log file. (default /var/run/cilium/hubble/events.log)
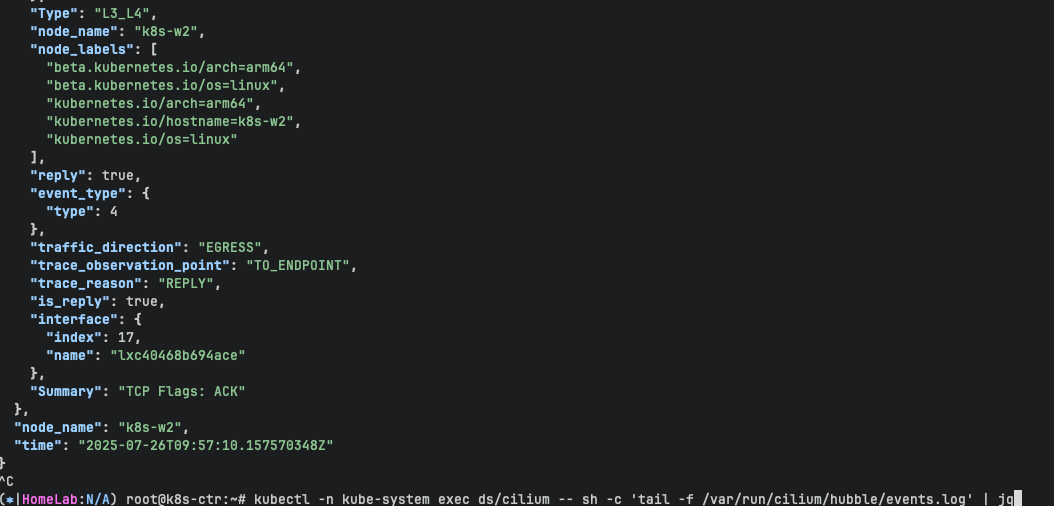
# Verify that flow logs are stored in target files
kubectl -n kube-system exec ds/cilium -- tail -f /var/run/cilium/hubble/events.log
kubectl -n kube-system exec ds/cilium -- sh -c 'tail -f /var/run/cilium/hubble/events.log' | jq
차후 실습할 내용들
Performance tuning
https://docs.cilium.io/en/stable/observability/hubble/configuration/export/#performance-tuning
Dynamic exporter configuration
- 도전과제1 Dynamic exporter configuration (hubble flow logs) 로 파일 출력 후 해당 파일을 수집하여 볼 수 있는 중앙 로깅 시스템 구성해보기 ex. Loki
- 도전과제2 Configure TLS with Hubble
'devops > cilium' 카테고리의 다른 글
| 3주차 - Networking#1 - IPAM, Routing, Masquerading (0) | 2025.08.01 |
|---|---|
| 2주차 - Monitoring & Metrics (3) | 2025.07.26 |
| 1주차 - cilium 설치 (0) | 2025.07.19 |
| 1주차 - cilium CNI (2) | 2025.07.19 |
| 1주차 - flannel CNI (0) | 2025.07.14 |

