이전 글 이어서 작성됩니다
테스트
데모 App을 배포합니다.
kubectl apply -f https://raw.githubusercontent.com/istio/istio/release-1.26/samples/bookinfo/platform/kube/bookinfo.yaml
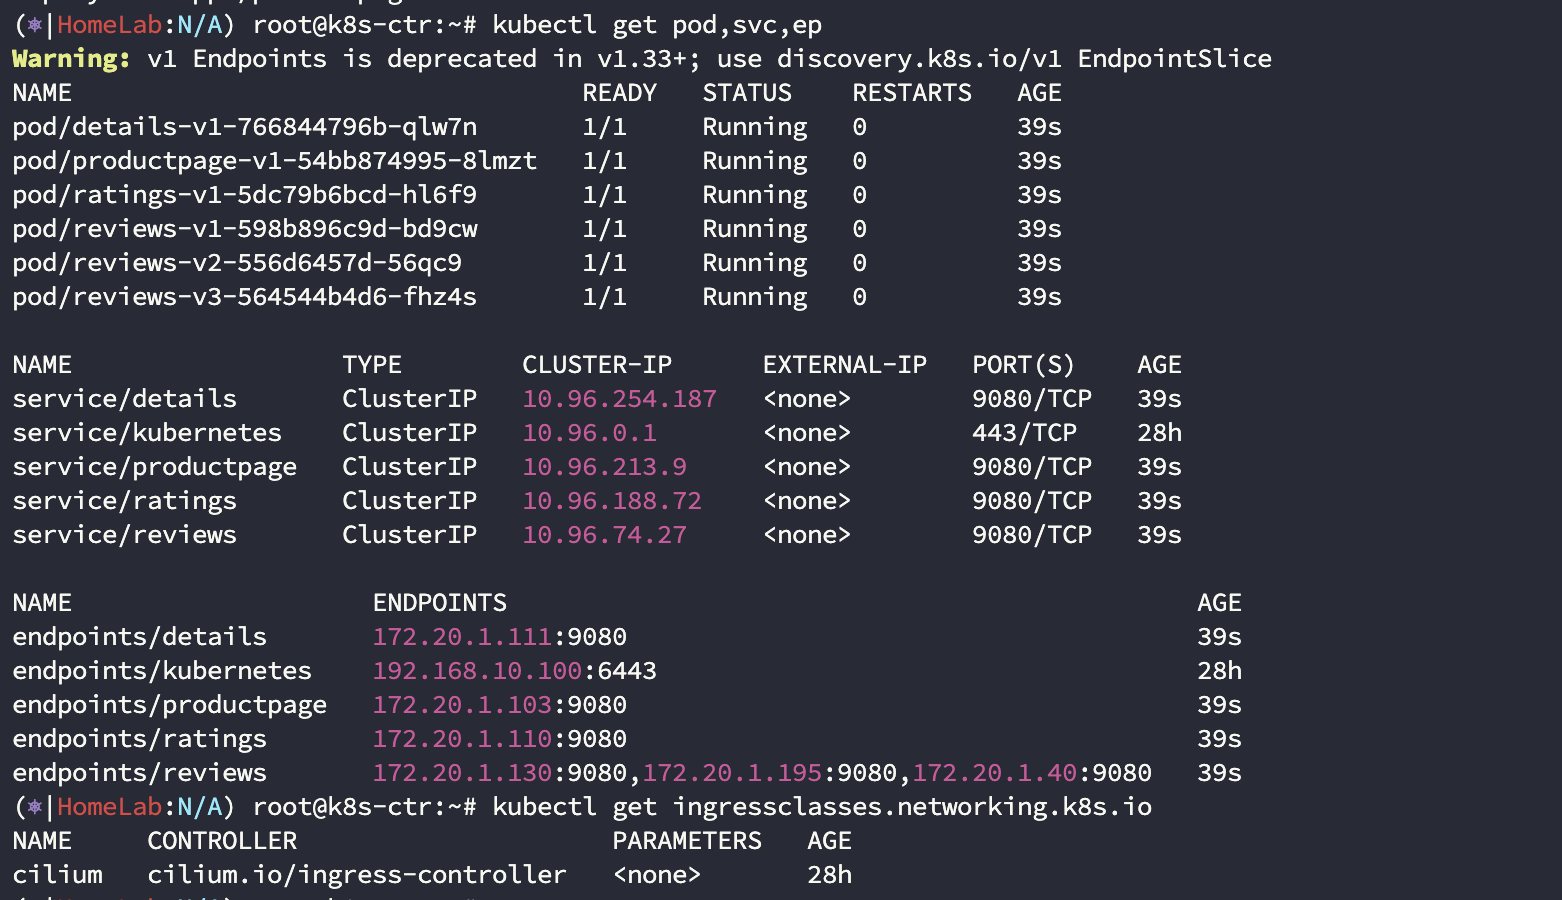
해당 데모 앱을 연결하기 위해 ingress를 배포해줍니다.
ingressClassName: cilium 를 통해 Cilium Ingress Controller 를 가리킵니다.
cat << EOF | kubectl apply -f -
apiVersion: networking.k8s.io/v1
kind: Ingress
metadata:
  name: basic-ingress
  namespace: default
spec:
  ingressClassName: cilium
  rules:
  - http:
      paths:
      - backend:
          service:
            name: details
            port:
              number: 9080
        path: /details
        pathType: Prefix
      - backend:
          service:
            name: productpage
            port:
              number: 9080
        path: /
        pathType: Prefix
EOF
위 Ingress 명세에는 /details 와 / 가 명시되어 있고
URL경로는 각각 details 서비스와 productpage 서비스로 흐르게됩니다.
서비스 진입점은 Ingress Controller 이고 이전글에서 연결했던
EXTERNAL-IP: 192.168.10.211 이 연결 IP가 됩니다.

명세를 통해 생성된 Ingress는 아래와 같습니다.

| 외부 포트 | 노드 내부 포트 |
| 80 | 32046 |
| 443 | 31695 |
인입 흐름도는 아래와 같습니다.
# cilium ingress는 ebpf 동작으로 nodeport를 실제로 지나지 않습니다

Client → 192.168.10.211:80
             ↓
노드 (eth1)
             ↓
eBPF (TC ingress hook)
             ↓
Envoy
k8s-ctr 노드에서 아래와 같은 순서로 테스트도 가능합니다.
# 호출 확인
LBIP=$(kubectl get svc -n kube-system cilium-ingress -o jsonpath='{.status.loadBalancer.ingress[0].ip}')
echo $LBIP

# 실패하는 호출이 있는가?
curl -so /dev/null -w "%{http_code}\n" http://$LBIP/
curl -so /dev/null -w "%{http_code}\n" http://$LBIP/details/1
curl -so /dev/null -w "%{http_code}\n" http://$LBIP/ratings

# Access the Bookinfo application
curl "http://$LBIP/productpage?u=normal"
hubble
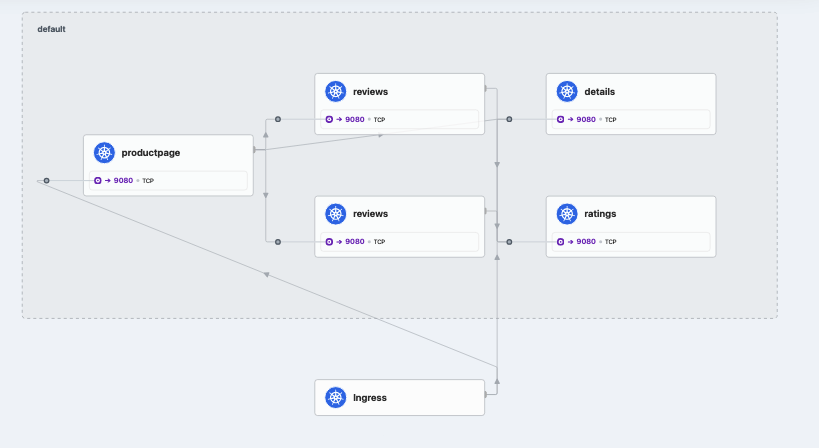
클러스터 내부 hubble에 접근하도록 포트포워딩을 열겠습니다.
cilium hubble port-forward&
hubble observe -f -t l7
L7 (HTTP, gRPC 등) 트래픽을 실시간으로 출력합니다.
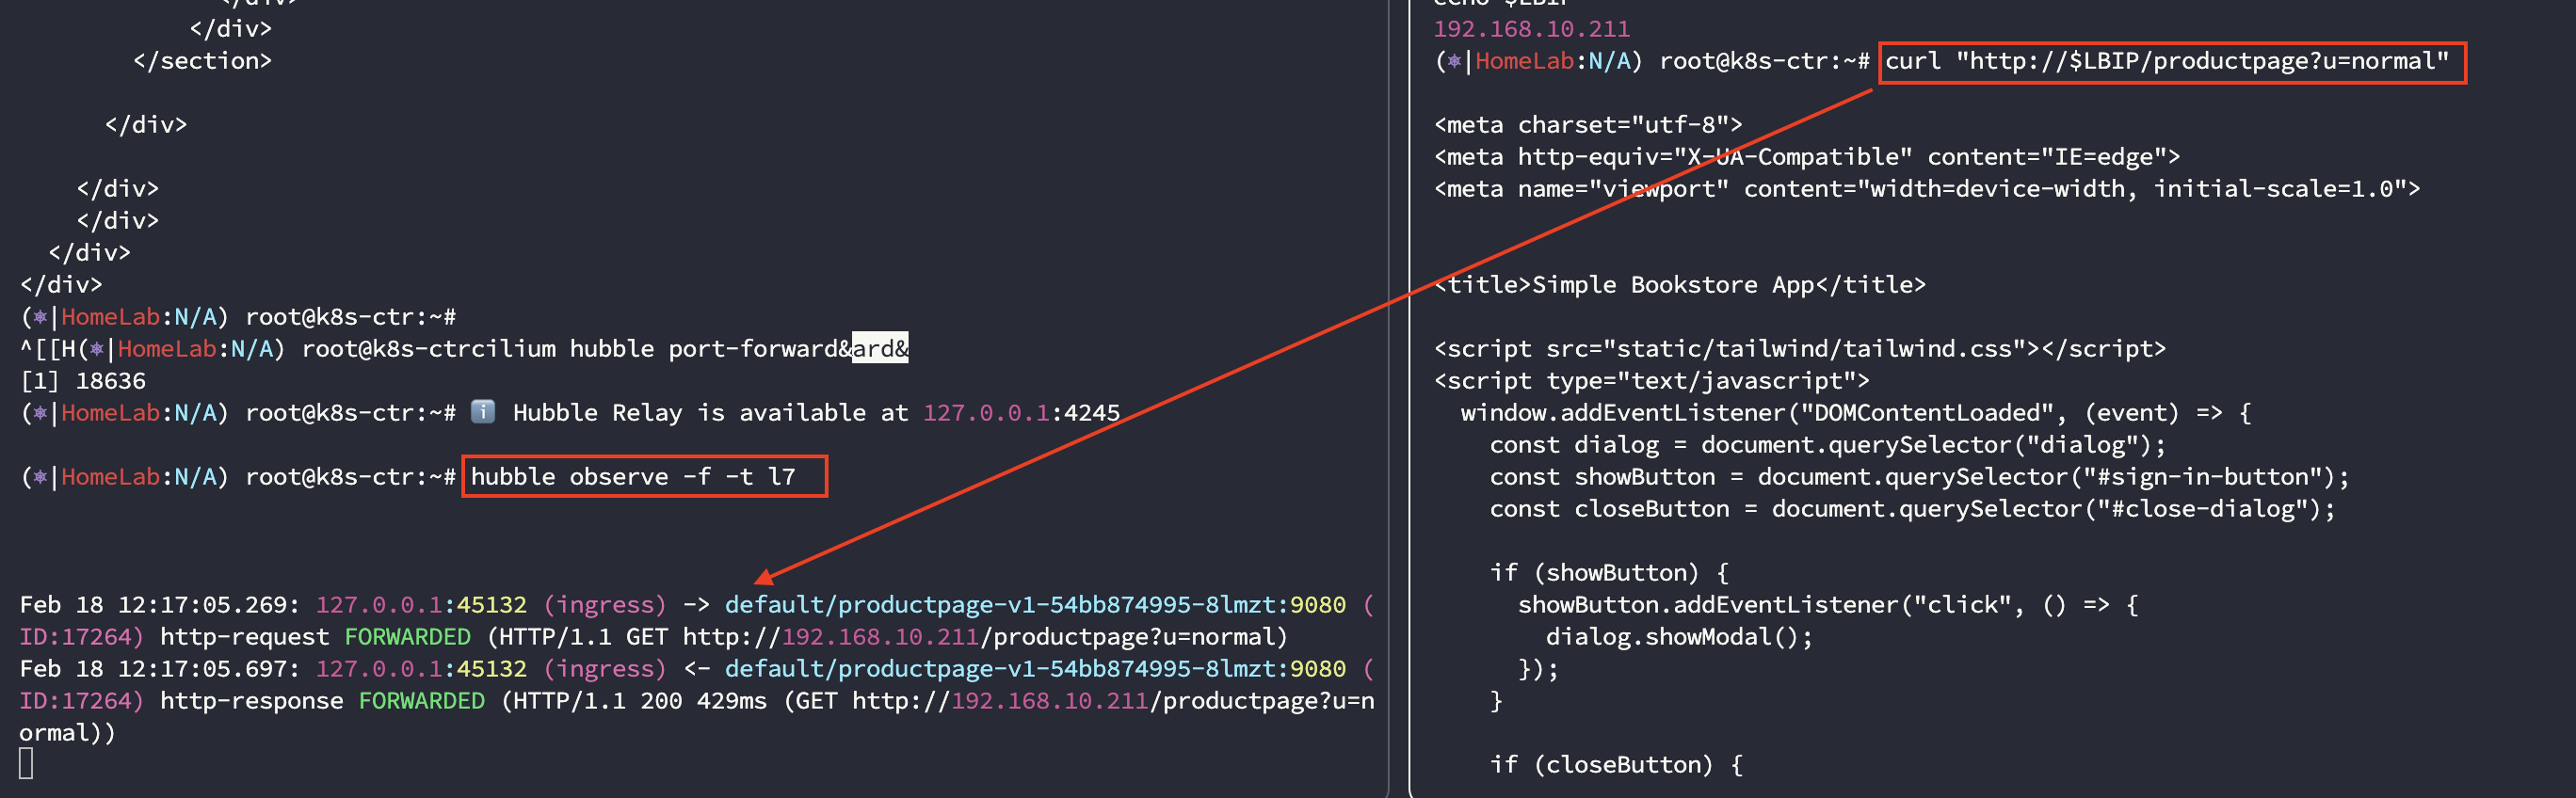
출력된 내용은 아래와 같습니다.
$ hubble observe -f --identity ingress

Feb 18 12:22:17.019: 172.20.0.106:40867 (ingress) -> default/productpage-v1-54bb874995-8lmzt:9080 (ID:17264) to-endpoint FORWARDED (TCP Flags: SYN)
Feb 18 12:22:17.019: 172.20.0.106:40867 (ingress) <- default/productpage-v1-54bb874995-8lmzt:9080 (ID:17264) to-network FORWARDED (TCP Flags: SYN, ACK)
Feb 18 12:22:17.019: 172.20.0.106:40867 (ingress) -> default/productpage-v1-54bb874995-8lmzt:9080 (ID:17264) to-endpoint FORWARDED (TCP Flags: ACK)
Feb 18 12:22:17.020: 172.20.0.106:40867 (ingress) <> default/productpage-v1-54bb874995-8lmzt (ID:17264) pre-xlate-rev TRACED (TCP)
Feb 18 12:22:17.020: 127.0.0.1:59664 (ingress) -> default/productpage-v1-54bb874995-8lmzt:9080 (ID:17264) http-request FORWARDED (HTTP/1.1 GET http://192.168.10.211/productpage?u=normal)
Feb 18 12:22:17.020: 172.20.0.106:40867 (ingress) -> default/productpage-v1-54bb874995-8lmzt:9080 (ID:17264) to-endpoint FORWARDED (TCP Flags: ACK, PSH)
Feb 18 12:22:17.078: 172.20.0.106:40867 (ingress) <- default/productpage-v1-54bb874995-8lmzt:9080 (ID:17264) to-network FORWARDED (TCP Flags: ACK, PSH)
Feb 18 12:22:17.079: 127.0.0.1:59664 (ingress) <- default/productpage-v1-54bb874995-8lmzt:9080 (ID:17264) http-response FORWARDED (HTTP/1.1 200 60ms (GET http://192.168.10.211/productpage?u=normal))
Feb 18 12:22:19.079: 172.20.0.106:40867 (ingress) <- default/productpage-v1-54bb874995-8lmzt:9080 (ID:17264) to-network FORWARDED (TCP Flags: ACK, FIN)
Feb 18 12:22:19.079: 172.20.0.106:40867 (ingress) -> default/productpage-v1-54bb874995-8lmzt:9080 (ID:17264) to-endpoint FORWARDED (TCP Flags: ACK, FIN)
---
172.20.0.106:40867 (ingress)
-> Envoy가 backend로 새로 만든 TPC 연결의 source (ingress = identity)
default/productpage
-> backend
---
172.20.0.106은 어느 ip일까요?
Envoy에서 백엔드로 향했다면 Envoy IP이어야하는데
노드를 확인해보니 Envoy는 192.168.10.x 대역으로 떠있습니다. (hostNetwork: true)

이전 글에서 Cilium은 IP 기반이 아닌 Identity 기반 정책 모델을 사용하고,
따라서 정책 평가 단계에서는 reserved:ingress identity를 별도로 적용하여
host 트래픽과 Ingress 트래픽을 명확히 구분한다고 하였습니다.
이를 위해 내부적으로 Pod 네트워크 대역(예: 172.20.x.x)에서 /32 주소를 예약한다고 하였습니다.
Hubble에서 보이는 172.20.0.106은 해당 ingress identity에 매핑된 내부 endpoint IP입니다.

hubble observe -f --identity ingress
ingress identity 관련 트래픽만 필터링
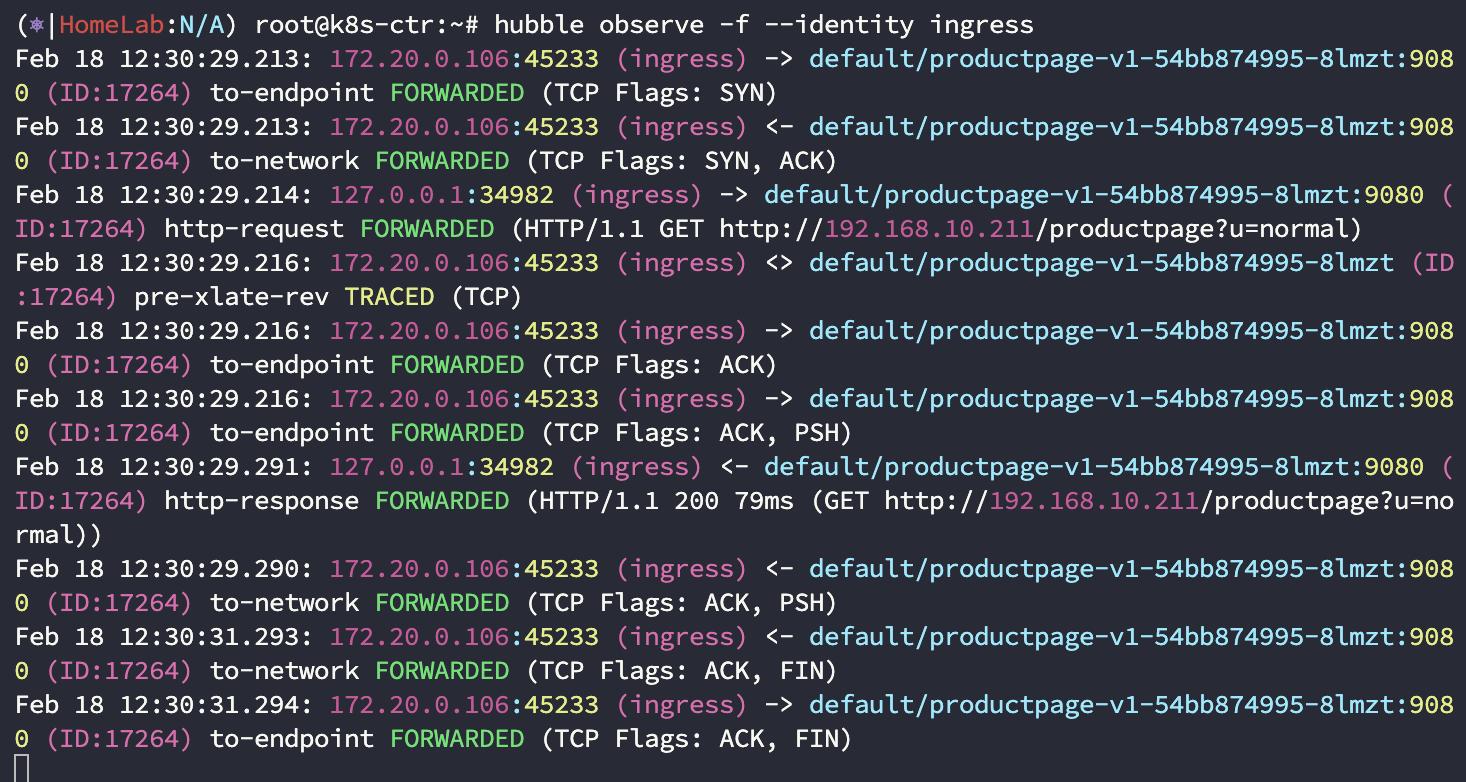
패킷 흐름 확인하기
Cilium Ingress -> Envoy -> Backend 흐름을 실제 패킷으로 확인해보겠습니다.
productpage 파드로 들어가는 흐름을 확인해보겠습니다.
productpage 위치확인
k8s-w1 노드에 있다는걸 확인했습니다.
(⎈|HomeLab:N/A) root@k8s-ctr:~# kubectl get pod -l app=productpage -owide
NAME                              READY   STATUS    RESTARTS   AGE   IP             NODE     NOMINATED NODE   READINESS GATES
productpage-v1-54bb874995-8lmzt   1/1     Running   0          34m   172.20.1.103   k8s-w1   <none>           <none>
veth 인터페이스 정보 확인
172.20.1.103 이라는 ip로 k8s-w1 에서 veth 인터페이스를 확인해보겠습니다.
$ ip route | grep 172.20.1.103
172.20.1.103 dev lxc8eb3d4f289d8 proto kernel scope link
ngrep 으로 veth 패킷 캡처
lxc8eb3d4f289d8 (veth)로 지나가는 트래픽을 ngrep 으로 캡처하겠습니다.
ingress에 적어 두었듯이 productpage는 9080 TCP Port를 사용합니다.
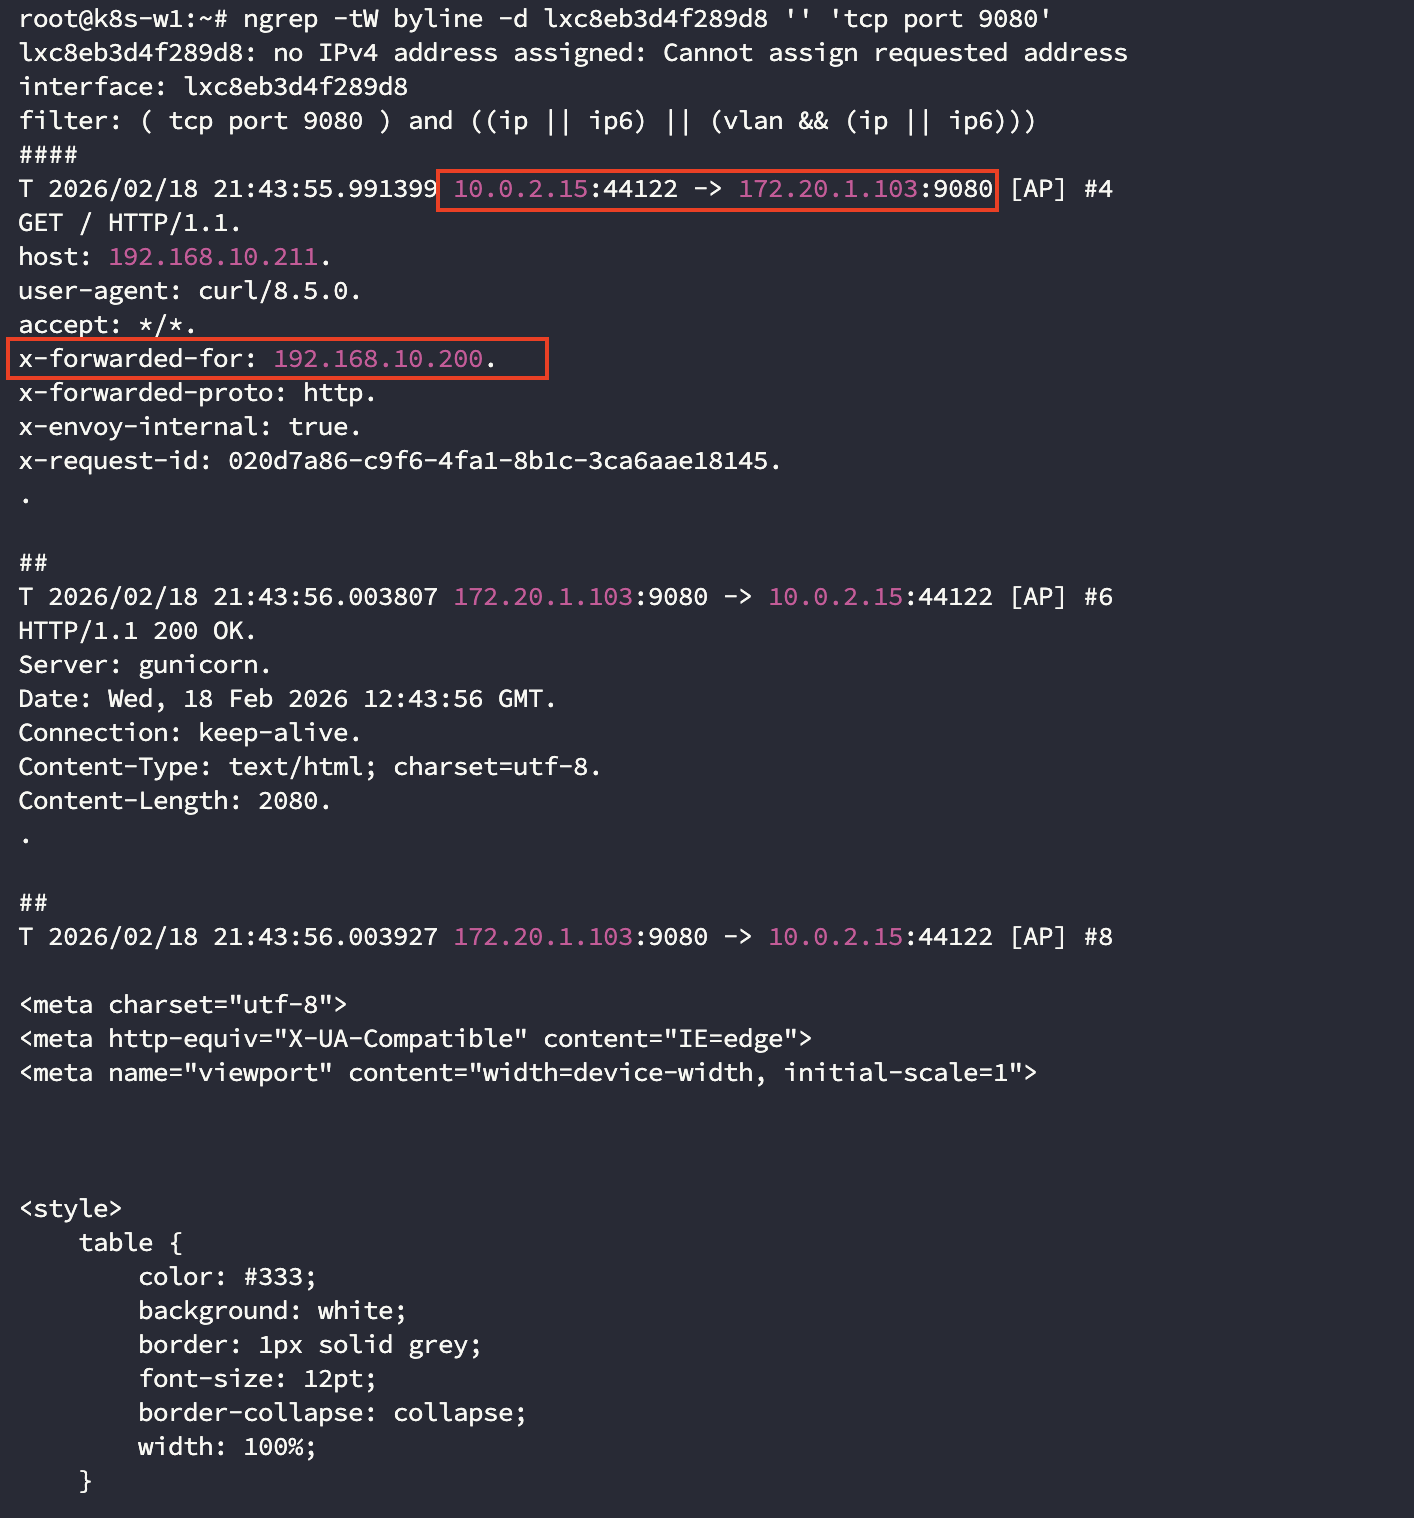
ngrep -tW byline -d lxc8eb3d4f289d8 '' 'tcp port 9080'
외부 router 노드에서 curl 로 LBIP에 접근해봅니다.
root@router:~# curl -s http://192.168.10.211
흐름은 아래와 같이 들어옵니다.
Router (192.168.10.200)
    ↓
VIP (192.168.10.211)
    ↓
eBPF
    ↓
Envoy (hostNetwork)
    ↓
Linux routing
    ↓
Backend Pod
ngrep 정보
ngrep 호출하면 아래 몇가지 IP 정보를 확인할 수 있습니다.
veth 를 캡처하니 아래 IP들이 확인됩니다.
x-forwarded-for 헤더의 값이 router IP인것으로 보아
igress(envoy) 가 XFF에 client-ip 담고, 목적지 파드로 요청했다는 것을 알 수 있습니다.
정리하자면,
순서대로 인입 흐름을 따라가 보겠습니다.
Cilium은 외부 -> ingress(Envoy) 구간,
ingress(Envoy) -> backend 구간으로 나누어서 보면 좋습니다.
router에서 curl 로 요청이 들어오고 LB-IP는 192.168.10.211 입니다.
해당 VIP는 현재 leader가 k8s-w1 이고 인터페이스는 eth1으로 되어있습니다.
(지난 글을 참조하시길 바랍니다)

그렇게 패킷이 eth1으로 들어오면 Cilium eBPF 이 개입됩니다.
eth1
   ↓
TC ingress hook
   ↓
eBPF 프로그램 실행
Cilium은 VIP가 ingress 로 향하는 걸 알고있고
VIP -> NodePort(32046) 이 아니라
TPROXY 동작과정을 통해 Envoy로 전달합니다 (world identity 구간)
bpf_sk_lookup() → Envoy 소켓
bpf_sk_assign() → TPROXY redirect
이후 Envoy로 들어오면, Envoy는 백엔드와 새 TCP 연결을 만듭니다.
172.20.1.103 이라는 로컬 PodCIDR로 연결해야하고 (현재 product 백엔드는 w1 로컬에 있으므로)
기본 eth0 인터페이스(10.0.2.15)를 골라서 연결합니다.
백엔드는 10.0.2.15를 출발지 IP로 보게되므로
Envoy는 XFF 헤더에 192.168.10.200 = router IP를 담아서 백엔드로 전달합니다.
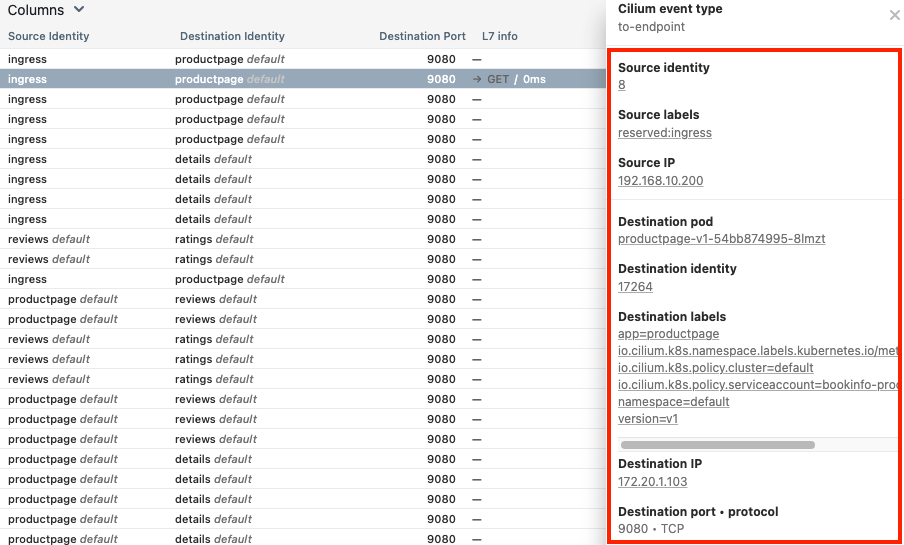
해당 내용은 Hubble UI 에서도 확인가능합니다.
Ingress and Network Policy Example
이제 Cilium Ingress 의 identity 기반으로 외부 트래픽을 차단/허용해보겠습니다.
reserved:world / reserved:ingress identity가 정책에서 실제로 어떻게 쓰이는지를 확인해보겠습니다.
클러스터 전체(모든 네임스페이스)에 적용되는 정책
클러스터 전체에 적용되는 정책을 적용합니다.
- endpointSelector: {} → 클러스터의 모든 엔드포인트(모든 Pod) 에 적용
- fromEntities: cluster → 클러스터 내부에서 오는 트래픽만 허용
- 그 외(= 외부 reserved:world)는 전부 차단
cat << EOF | kubectl apply -f -
apiVersion: "cilium.io/v2"
kind: CiliumClusterwideNetworkPolicy
metadata:
  name: "external-lockdown"
spec:
  description: "Block all the traffic originating from outside of the cluster"
  endpointSelector: {}
  ingress:
  - fromEntities:
    - cluster
EOF
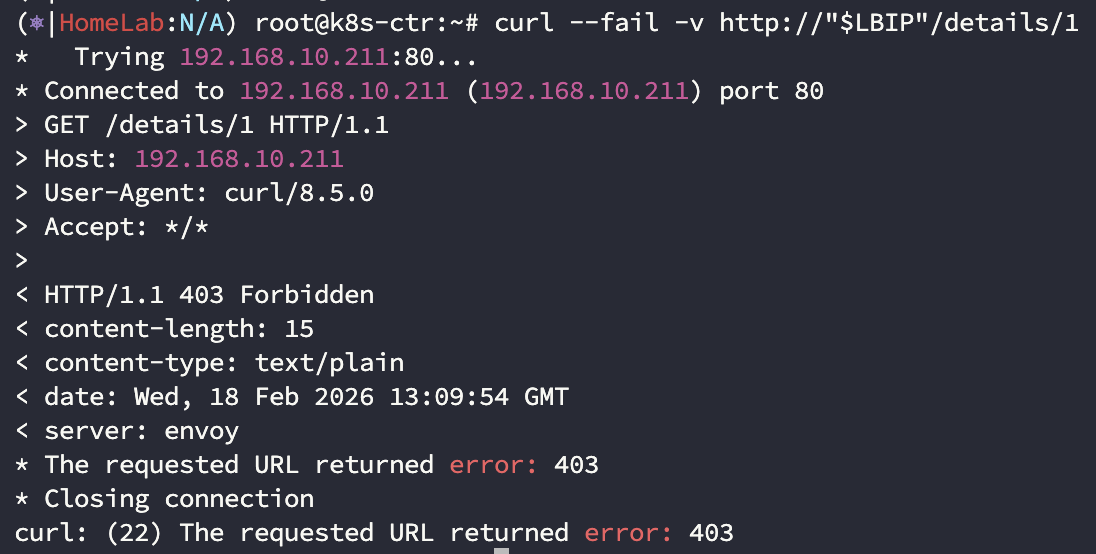
curl로 LB-IP에 접근하면 403 에러가 발생하는 것을 확인할 수 있습니다. (권한)
정책은 Envoy(Ingress)까지 전달되었지만
정책엔진이 외부(world)에서 온 요청으로 판단되어 DROP 되게 됩니다.

allow-cidr — ingress identity에 특정 CIDR만 허용
대상은 reserved:ingress identity(= ingress 경계)
- ingress로 들어오는 트래픽 중에서
- router(192.168.10.200)
- 로컬(127.0.0.1)
- 만 허용
특정 트래픽만 허용하는 정책입니다.
적용 이후 router/로컬 curl 이 가능해집니다.
cat << EOF | kubectl apply -f -
apiVersion: "cilium.io/v2"
kind: CiliumClusterwideNetworkPolicy
metadata:
  name: "allow-cidr"
spec:
  description: "Allow all the traffic originating from a specific CIDR"
  endpointSelector:
    matchExpressions:
    - key: reserved:ingress
      operator: Exists
  ingress:
  - fromCIDRSet:
    # Please update the CIDR to match your environment
    - cidr: 192.168.10.200/32
    - cidr: 127.0.0.1/32
EOF
Default Deny Ingress Policy
DNS쿼리와 kube-system내의 파드 제외 to deny all traffic by default 입니다.
- 대상: kube-system을 제외한 모든 Pod
- 기본: 모든 egress 차단
- 예외: kube-dns로 가는 UDP/53(DNS)만 허용
Ingress를 통해 들어온 요청도, 결국 ingress → backend egress가 막혀서 실패합니다.
cat << EOF | kubectl apply -f -
apiVersion: cilium.io/v2
kind: CiliumClusterwideNetworkPolicy
metadata:
  name: "default-deny"
spec:
  description: "Block all the traffic (except DNS) by default"
  egress:
  - toEndpoints:
    - matchLabels:
        io.kubernetes.pod.namespace: kube-system
        k8s-app: kube-dns
    toPorts:
    - ports:
      - port: '53'
        protocol: UDP
      rules:
        dns:
        - matchPattern: '*'
  endpointSelector:
    matchExpressions:
    - key: io.kubernetes.pod.namespace
      operator: NotIn
      values:
      - kube-system
EOF
allow-ingress-egress
위에서 ingress -> backend 로의 egress가 차단되었으므로 해당 구간만 허용해줍니다.
- 대상: reserved:ingress identity (Envoy)
- 허용: cluster 내부로의 egress 전부
cat << EOF | kubectl apply -f -
apiVersion: cilium.io/v2
kind: CiliumClusterwideNetworkPolicy
metadata:
  name: allow-ingress-egress
spec:
  description: "Allow all the egress traffic from reserved ingress identity to any endpoints in the cluster"
  endpointSelector:
    matchExpressions:
    - key: reserved:ingress
      operator: Exists
  egress:
  - toEntities:
    - cluster
EOF
위 테스트를 순서대로 hubble observe -f --identity ingress 로
모니터링하면서 해보시길 추천드립니다.
Cilium Ingress TLS Termination은
차후 인증서 정리 때 이어서 작성해보겠습니다.
'devops > cilium' 카테고리의 다른 글
| [Cilium ClusterMesh] 개념 및 환경준비 (0) | 2026.02.18 |
|---|---|
| [Cilium ServiceMesh] Cilium Ingress #실습1 (0) | 2026.02.17 |
| [Cilium ServiceMesh] Cilium Ingress #개념 (0) | 2026.02.17 |
| [Cilium ServiceMesh] TProxy (0) | 2026.02.15 |
| eBPF (Cilium networking) #2 BCC tools (0) | 2025.12.19 |


